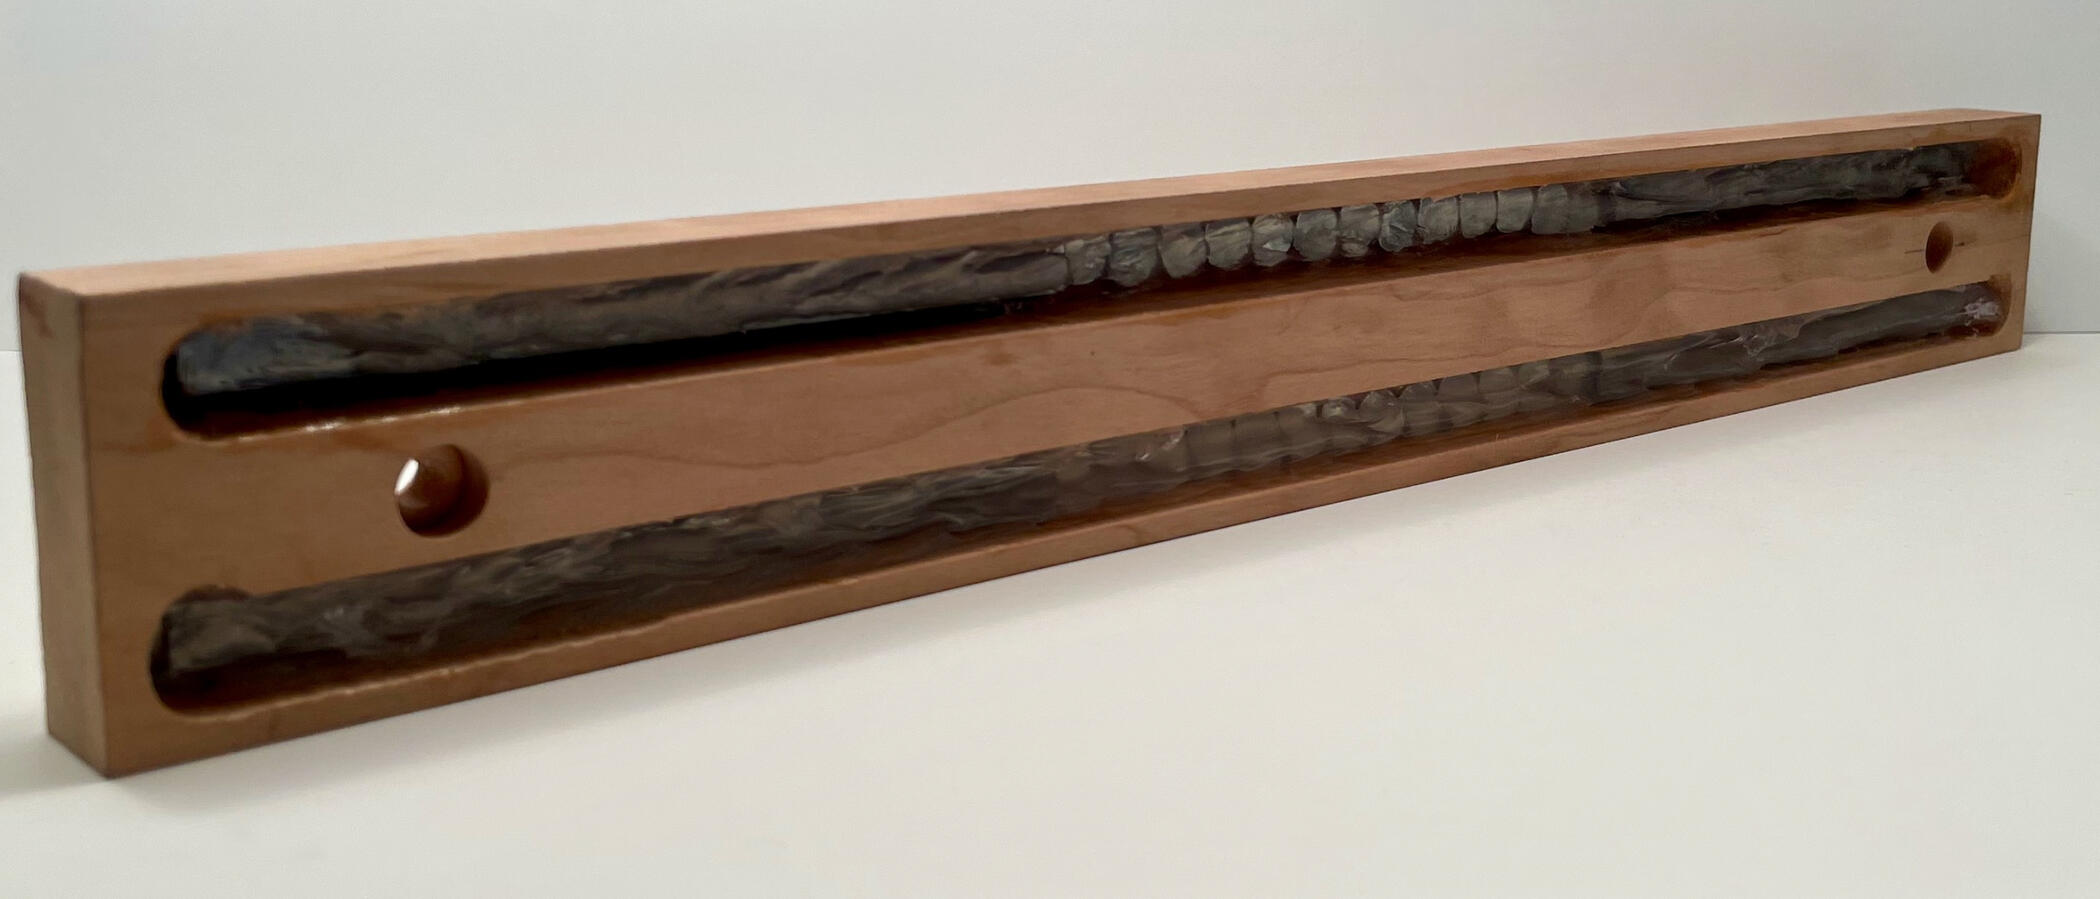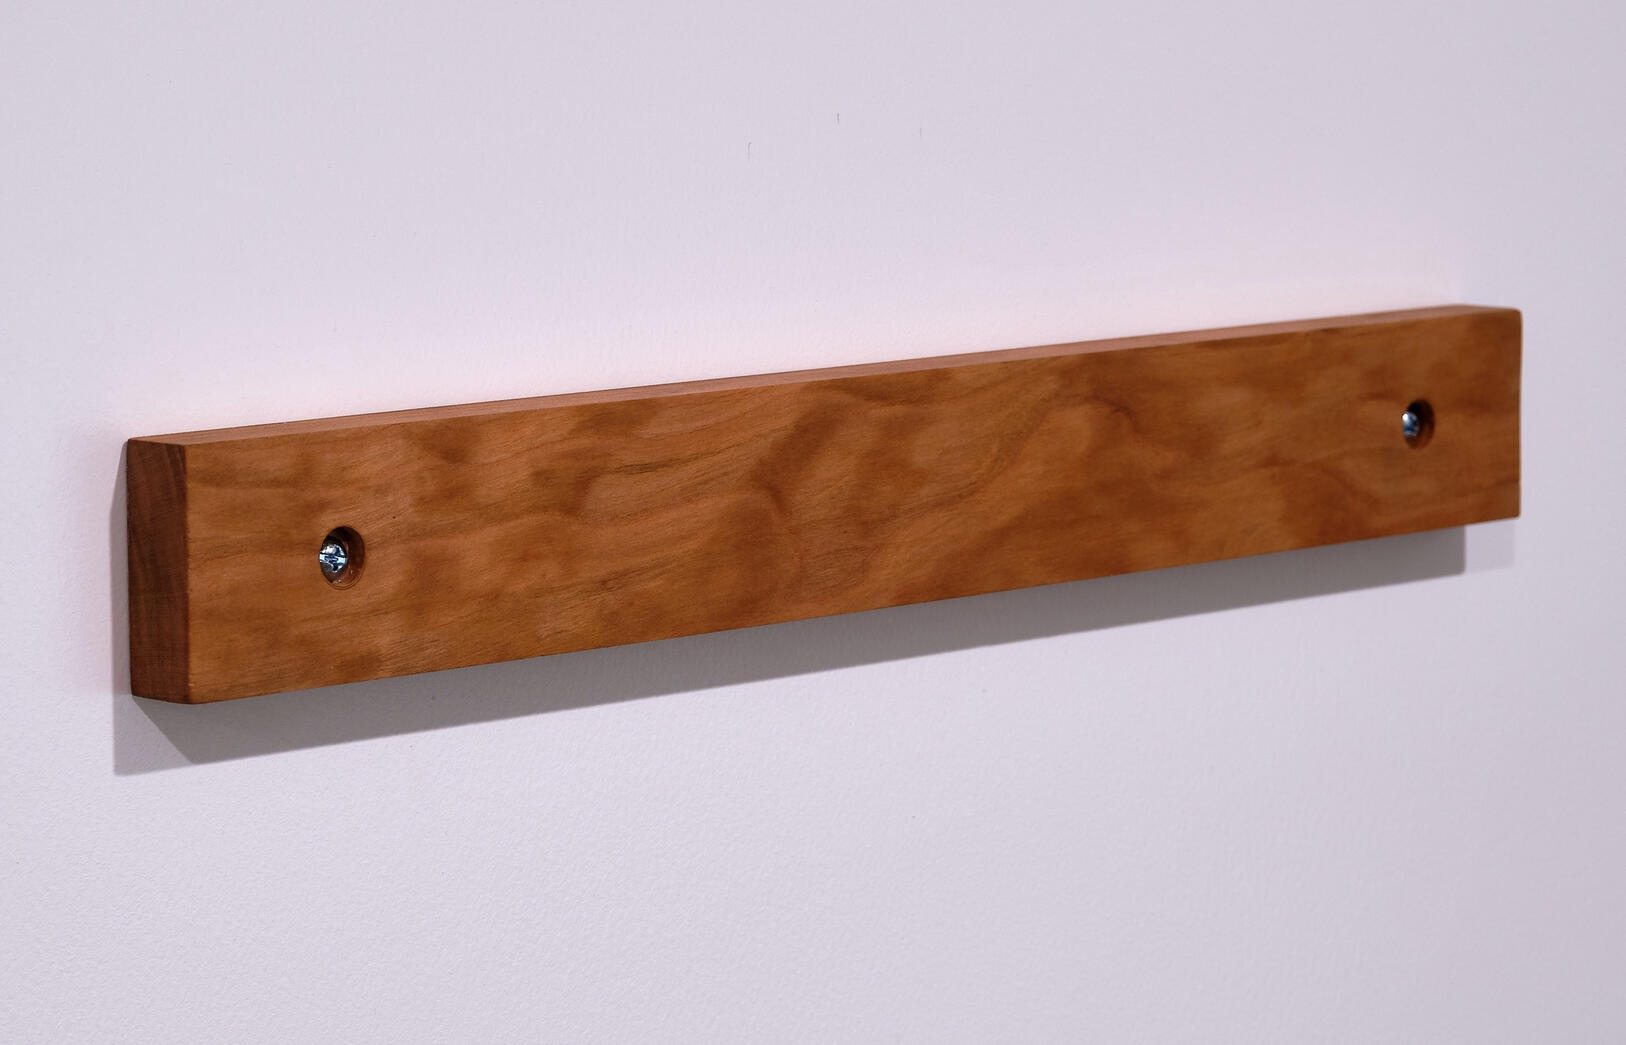
Knife Block
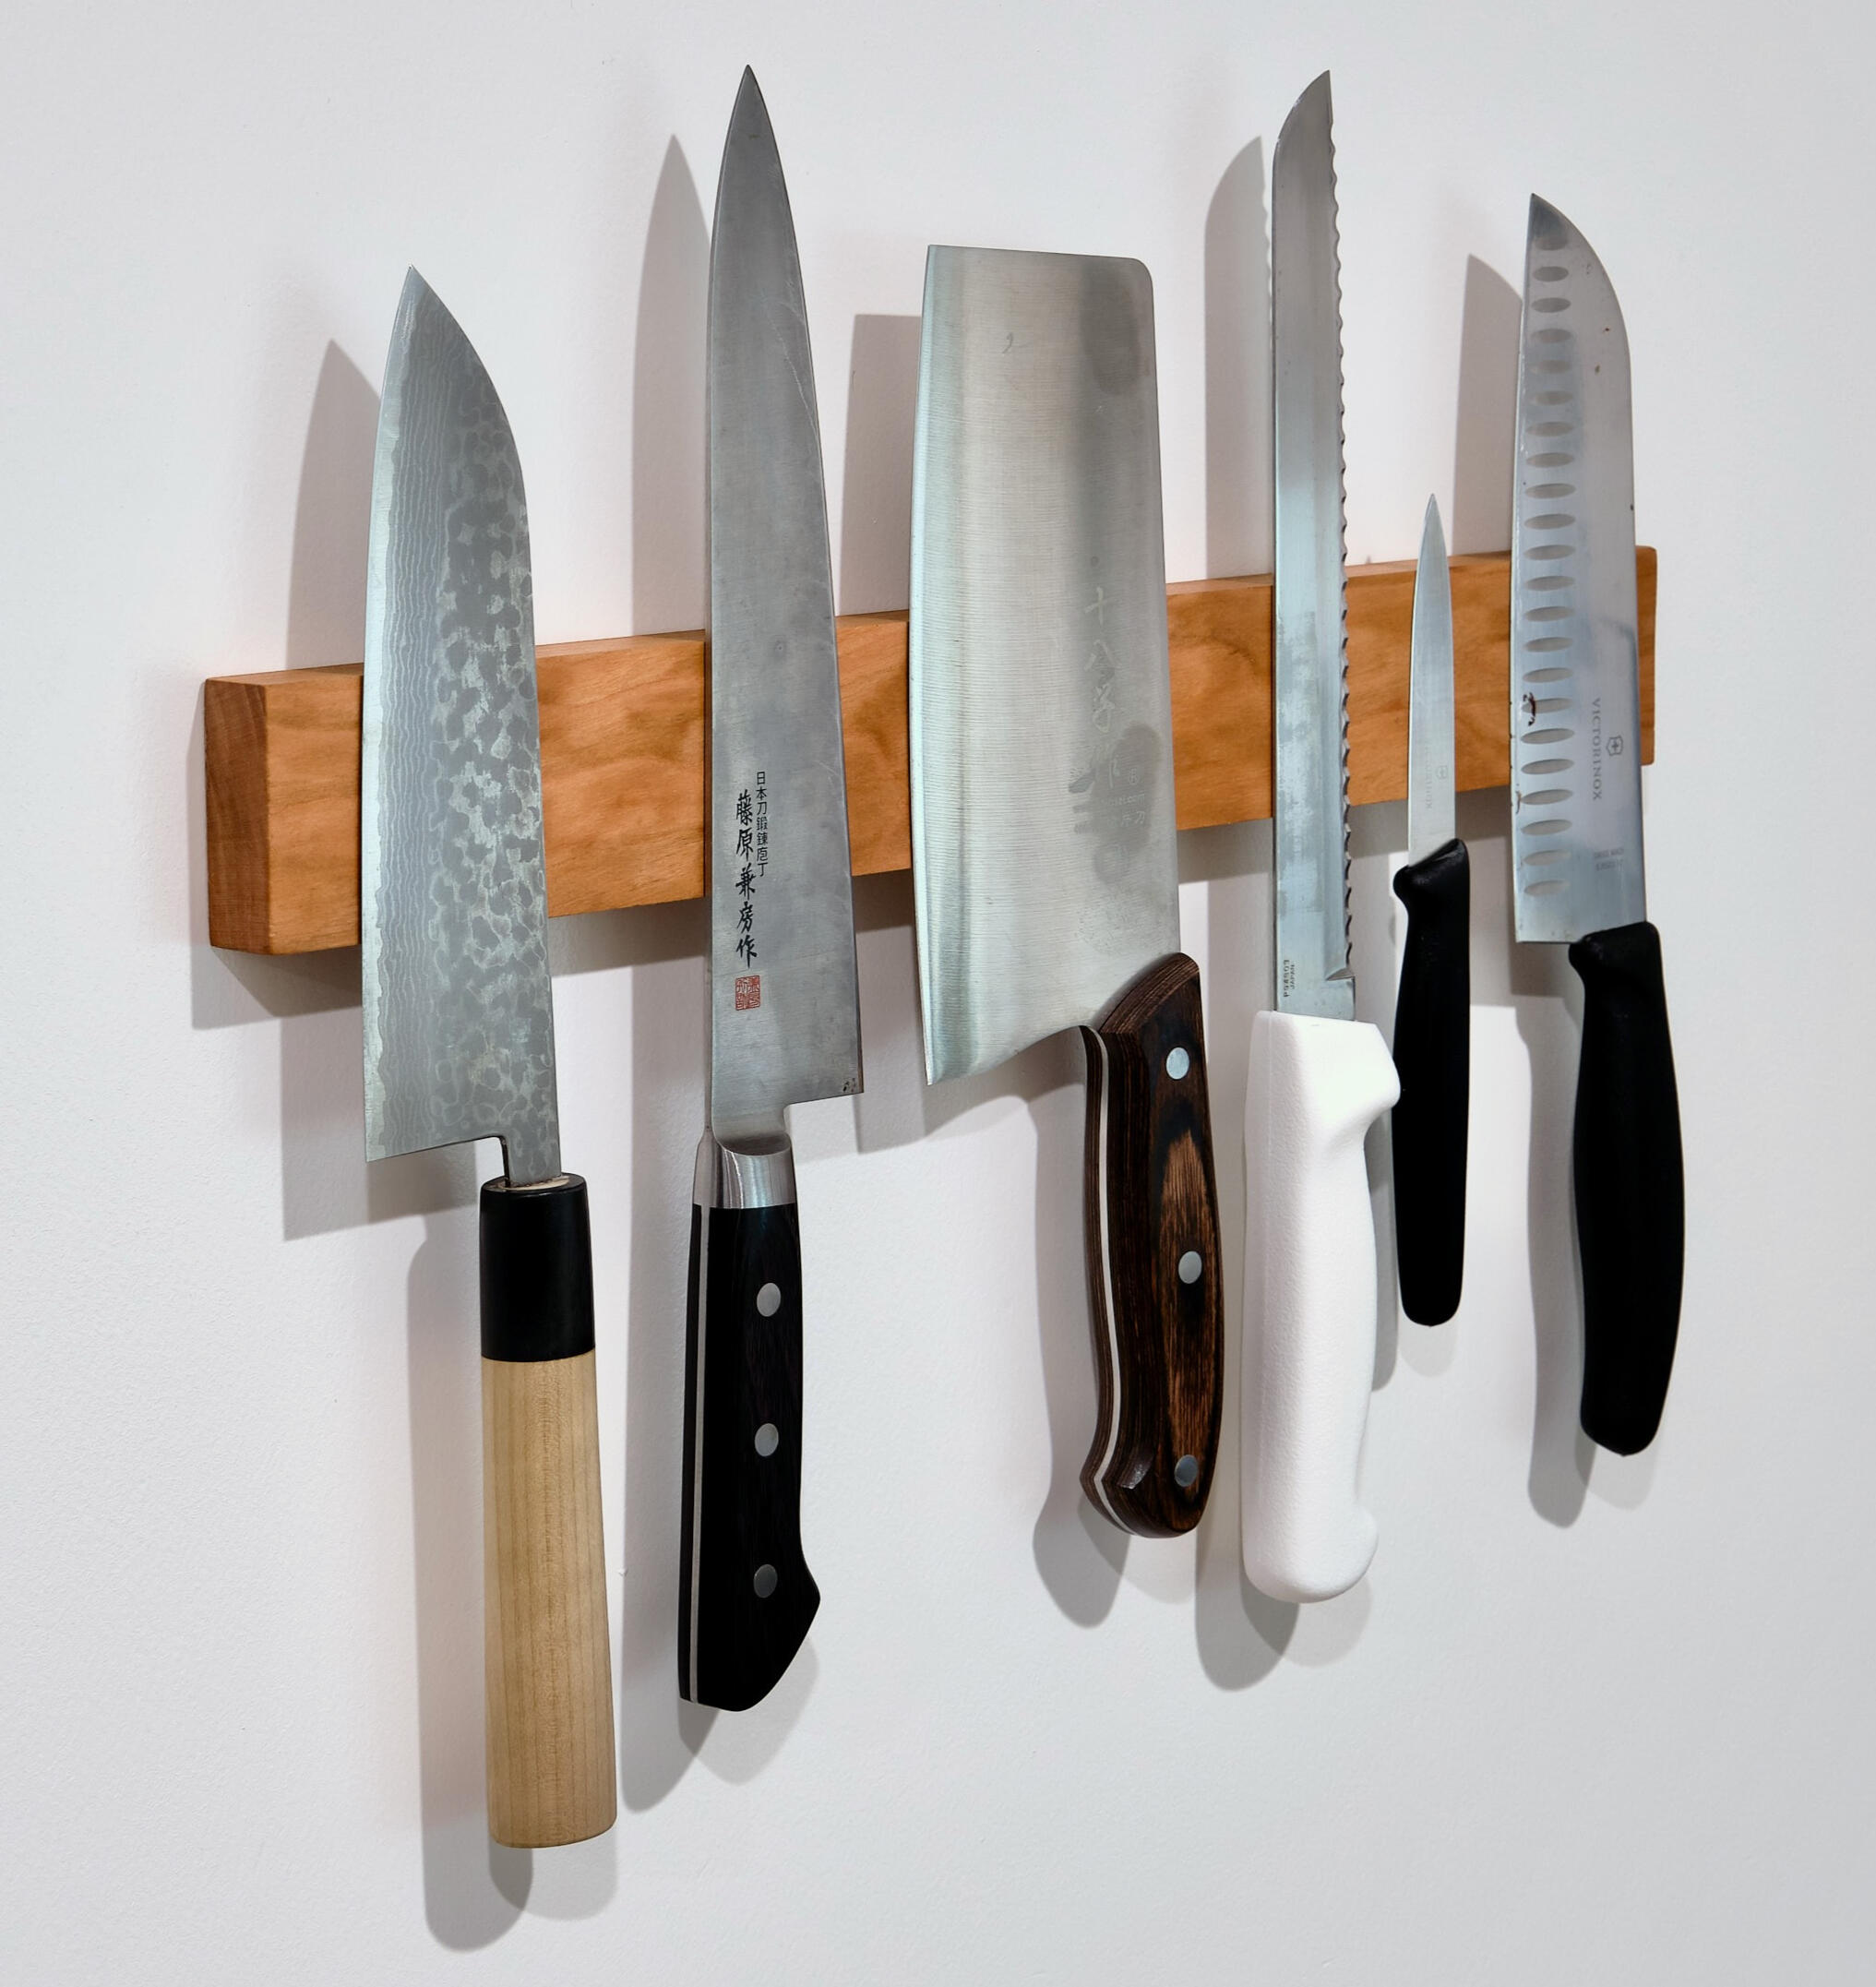
Each of my kitchen knives is from a different brand and of a different style, meaning none of them fit a generic slotted knife block perfectly. There has to be a better way to store knives!Enter the magnetic knife block.This is not a new idea. There are dozens if not hundreds of models available online. I'm lucky to live near a cutlery shop in the Mission district of San Francisco. All their knives are stored on magnetic holders on the walls, showcasing the knives as if they were levitating.They carry the line from a single brand, Woodsom, made from beautiful walnut. I was ready to walk out of the store with a brand new knife holder that instant, but hold on... $70?? It seems like a simple block of wood with some magnets inside; shouldn't be that expensive, right?This is my journey to find out.
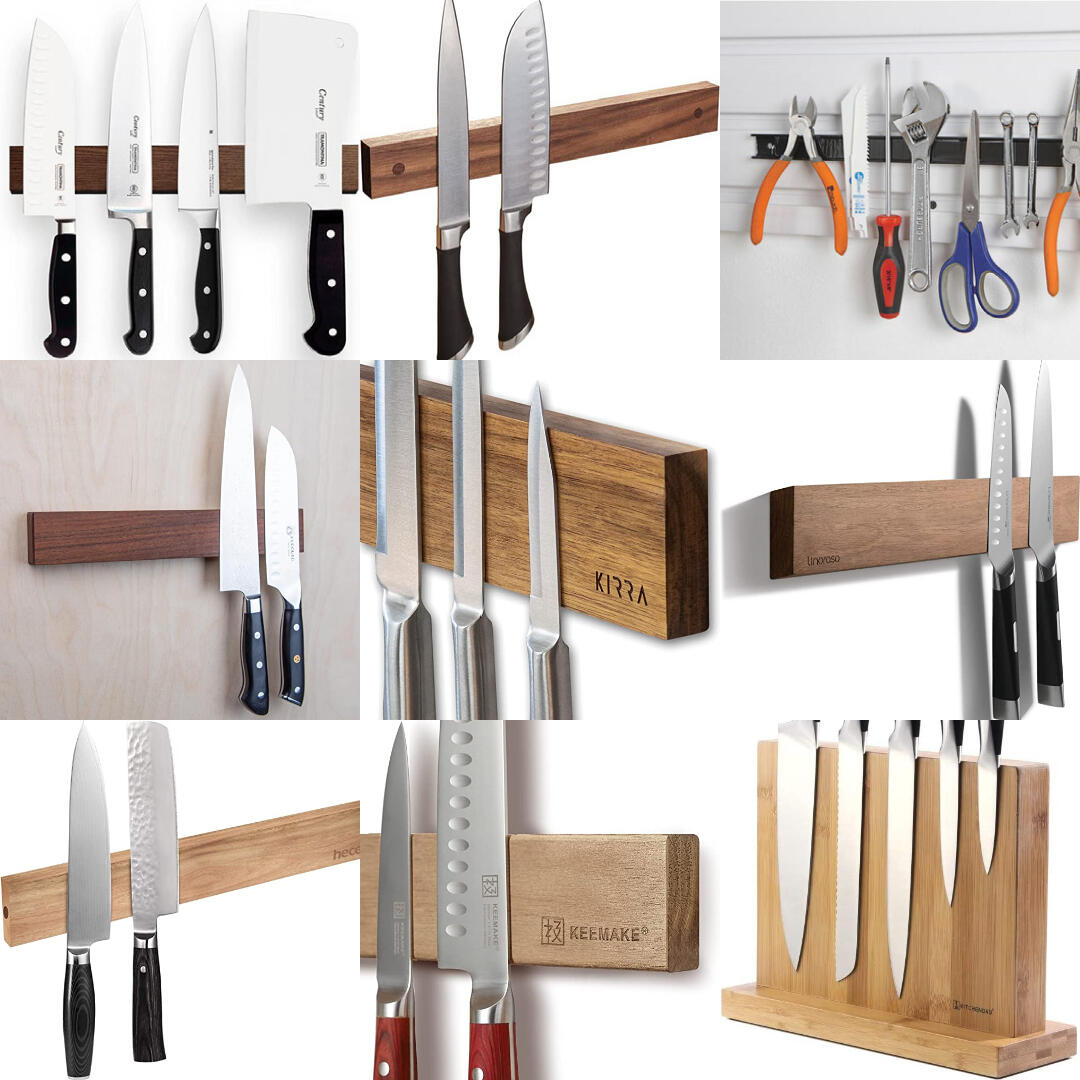
I ordered a wide selection of knife blocks online at different price points. All of them advertised "super", "ultra", "very" strong magnets, so I was eager to test those claims.The brands were:
- Linoroso
- Keemake
- SimpleusefulThings
- Kirra
- Kuroto
- Woodsom
- US General
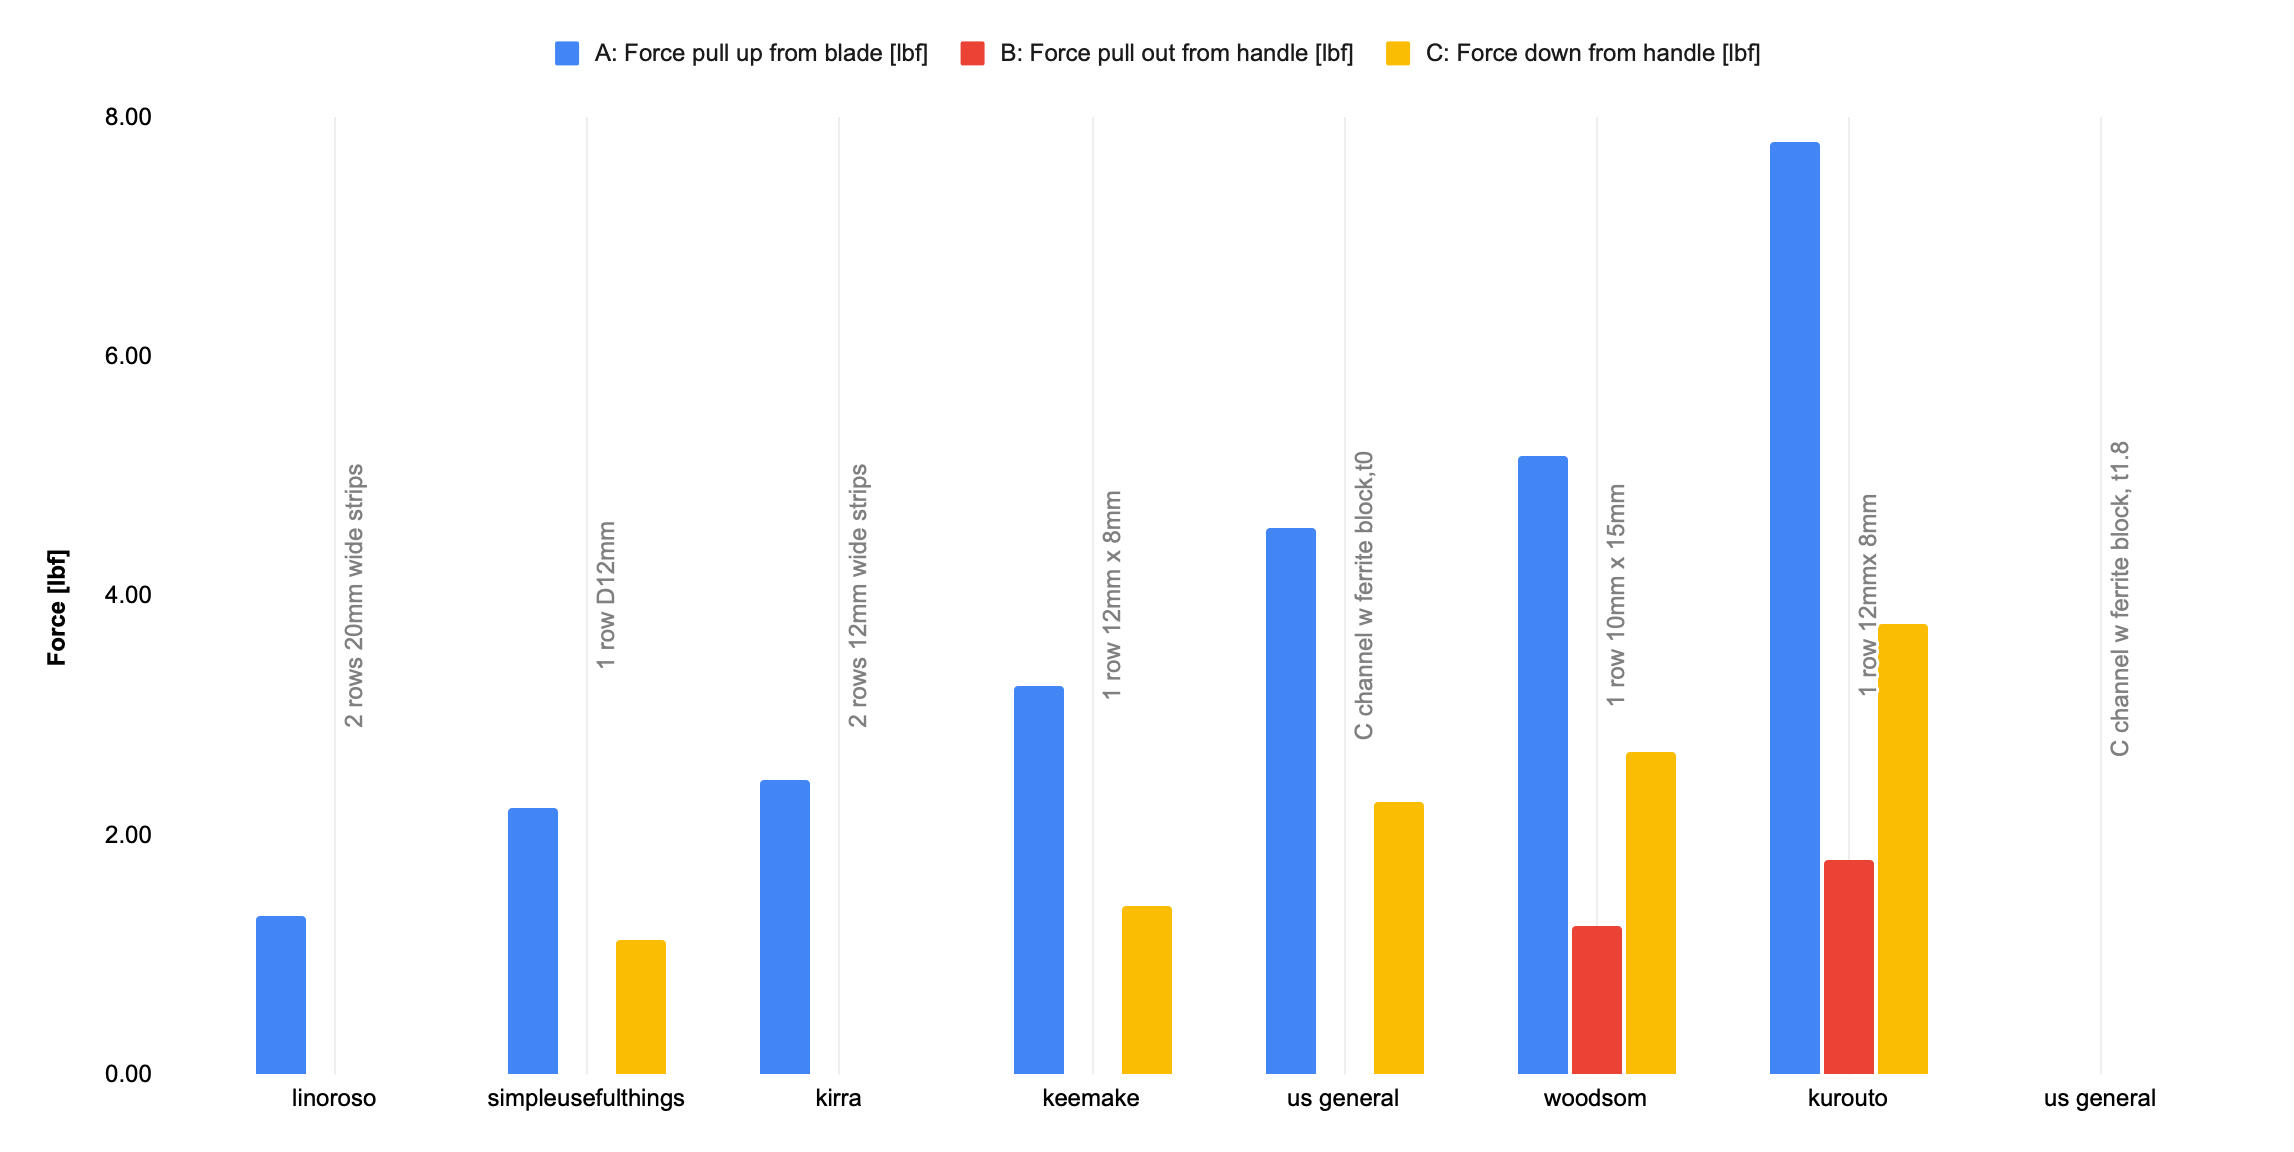
Of course, strength of the magnetic hold is just one part of the functionality of this product. At one extreme, too strong of a hold means it is difficult to take your knife off the block; at the other, it might fall off at the slightest bump.I came up with 5 different functional tests.
Test A: Force pulling up from the blade simulates how much force it would take to rotate the handle and thus lift the knife off the block. This is a common way that people will use magnetic knife blocks, since once the thin spine of the blade is the only contact point with the magnets, it is easy to remove the knife.
Test B: Force pulling out from the handle simulates an alternate method to remove a knife, which is turning the knife into a lever and pivoting it off the block. This could also simulate a bump if you pushed on the knife handle accidentally.
Test C: Force pulling down on the handle gives an indication of how secure the knife is to shifting around on the block, in plane.
Test D: Force to rotate the handle in the plane of the block. This indicates how sensitive the block is to knives being placed at an angle to vertical, which could lead to rotation of the knife under just its own weight.
Test E: Impact on the support of the block, simulating an earthquake or similar event. I decided not to include this test in the end, because all the knife holders seemed equally capable of holding knives when hit with a hammer from behind!
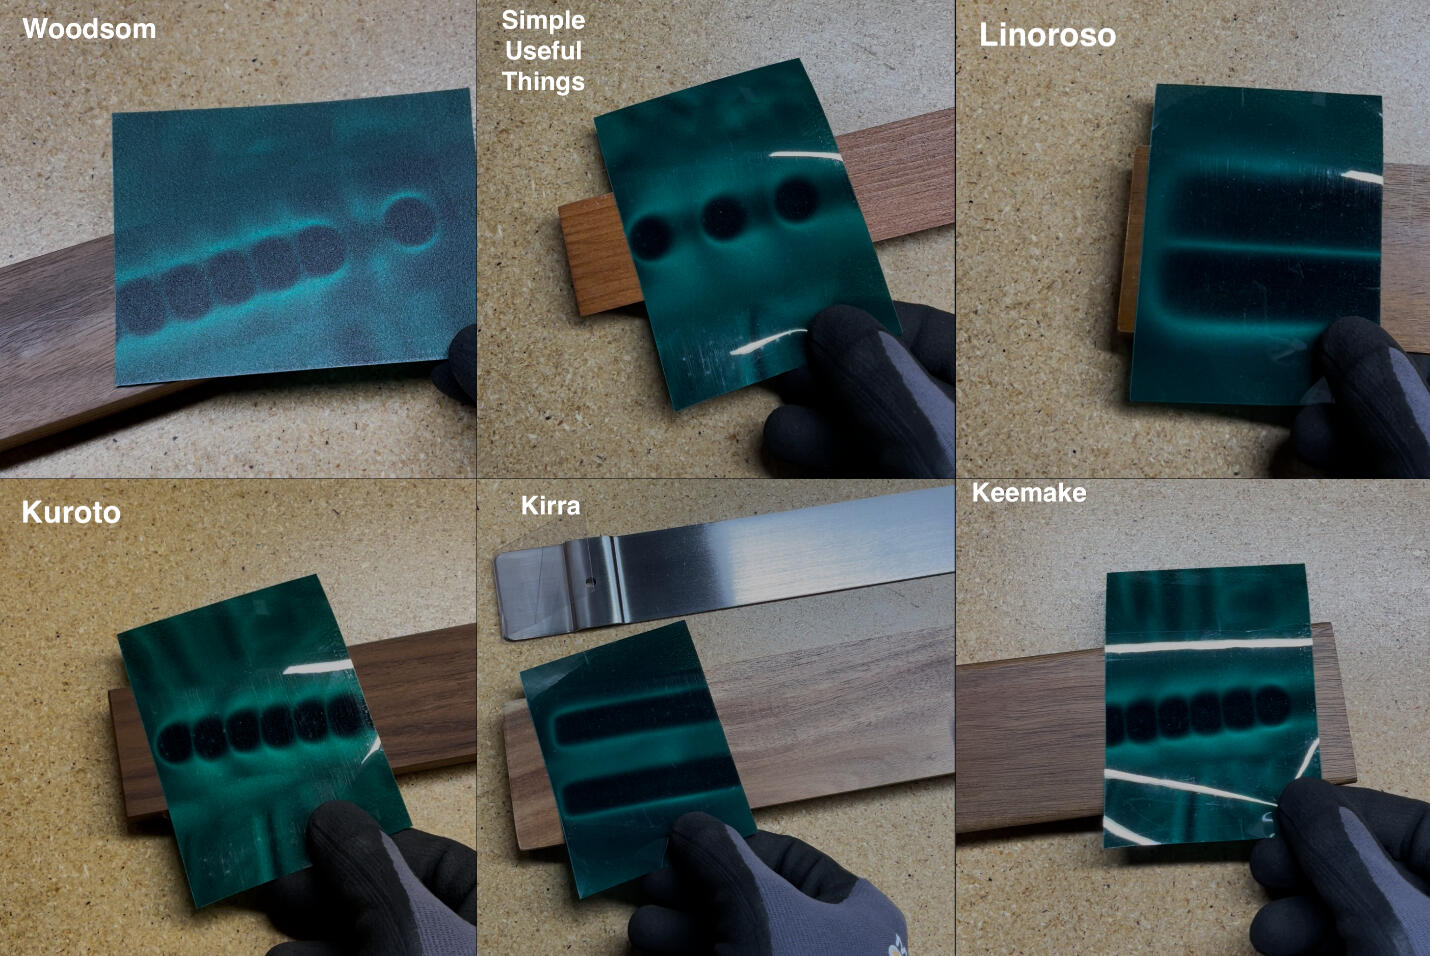
With the performance tests defined, I had to set the actual performance criteria. Since this is a human experience product, the best way to do this is by user testing. I found that a great balance between strength of magnets and ease of use was struck by the Woodsom and Kurouto brand blocks. That cutlery shop really did know what they were talking about! My only complaint would be that for thinner knives, I felt the retention strength could be a little stronger.I used a magnetic field viewing film to see the construction of the various competitor products (the US general block was not enclosed so I could see it was a ferrite bar magnet with a steel C channel). Most of the products used circular magnets. We can see that the 1 row Kurouto and Woodsom performed best; theoretically the 2 row ones could have been better but the magnets used for those are probably super cheap ferrite magnets and are just not strong enough.The "simpleusefulthings" used magnets spaced too far apart and had very poor performance. Most did not extend the magnets all the way to the edges, so props to Woodsom for placing a lone magnet all the way at the edge!Here's the data for the tested products on the left. Some of the blocks, such as the Linoroso, SimpleUsefulThings, and Kirra, were too weak to feel confident using them in my kitchen; the Woodsom and Kuroto blocks felt great.Where a bar is missing, it means the force was less than 1 lb (too small for my force gauge to measure). You'll notice Test D is not recorded-- most of the blocks had rotation forces less than 1 lb, which I couldn't measure, so it wasn't a very useful metric.
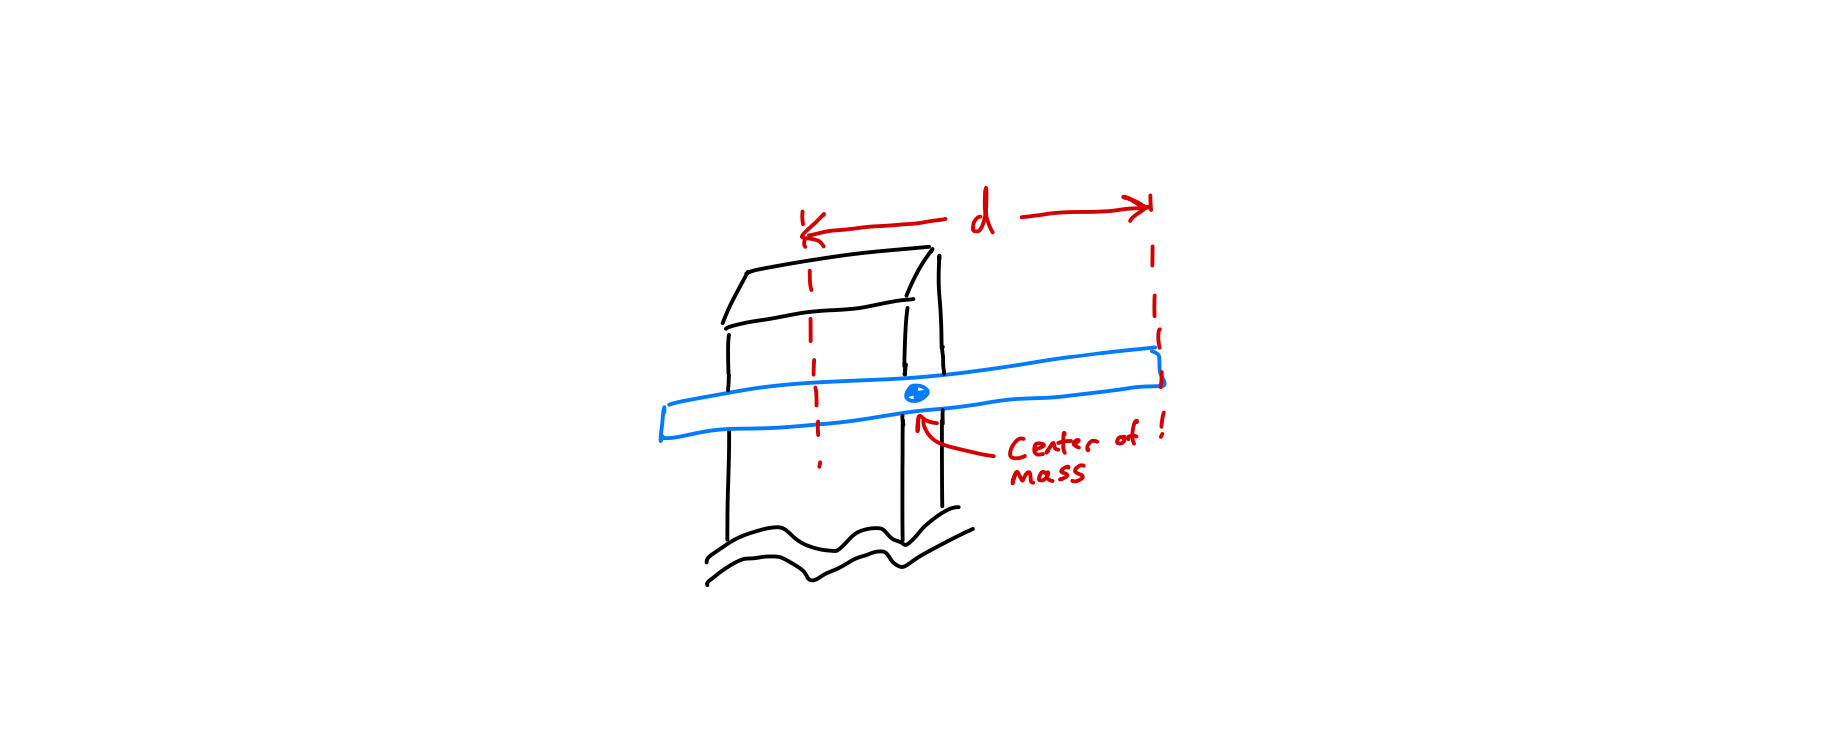
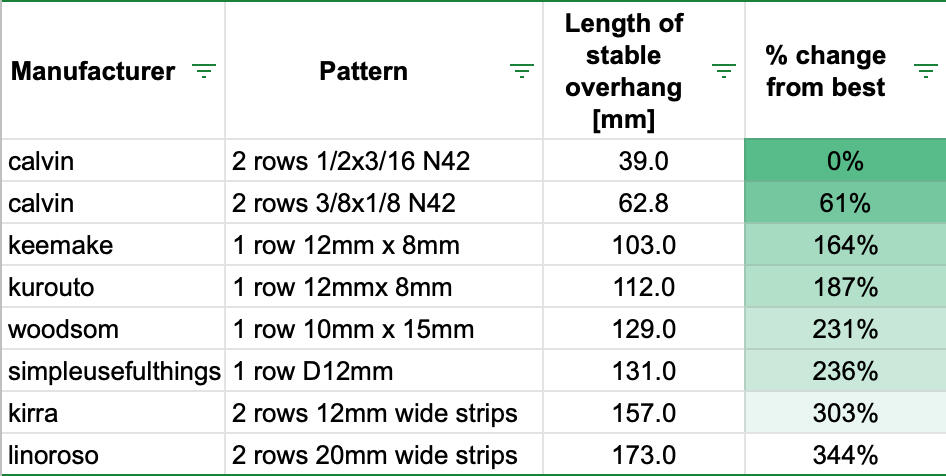
I found a simpler way to estimate this rotation resistance by taking a thin steel bar and letting gravity apply a force through the center of mass of the bar (with a vertically oriented knife block and a horizontal bar). By testing which length of overhang resulted in a rotation of the bar, I could get a sense of which products had stronger magnets. The brands with two rows of magnets, or bigger magnets, performed much better. That's due to the separation of the magnetic forces, generating a higher torque for a given force (T = r x F). I used this rudimentary test as a filter for the types of magnets I'd use. From some initial research, I had a sense of what kind of magnets I could start experimenting with.I found that two rows of circular magnets (spaced as far apart as possible in a two inch wide block), sized either d1/2" x t3/16" or the smaller d3/8" x t1/8", performed much better than any of the other competitors.
How about the other design choices for the block?
Material: wood for aesthetics; breathable so that moisture is not trapped between the knife blade and block causing rusting. More on the wood in a moment.
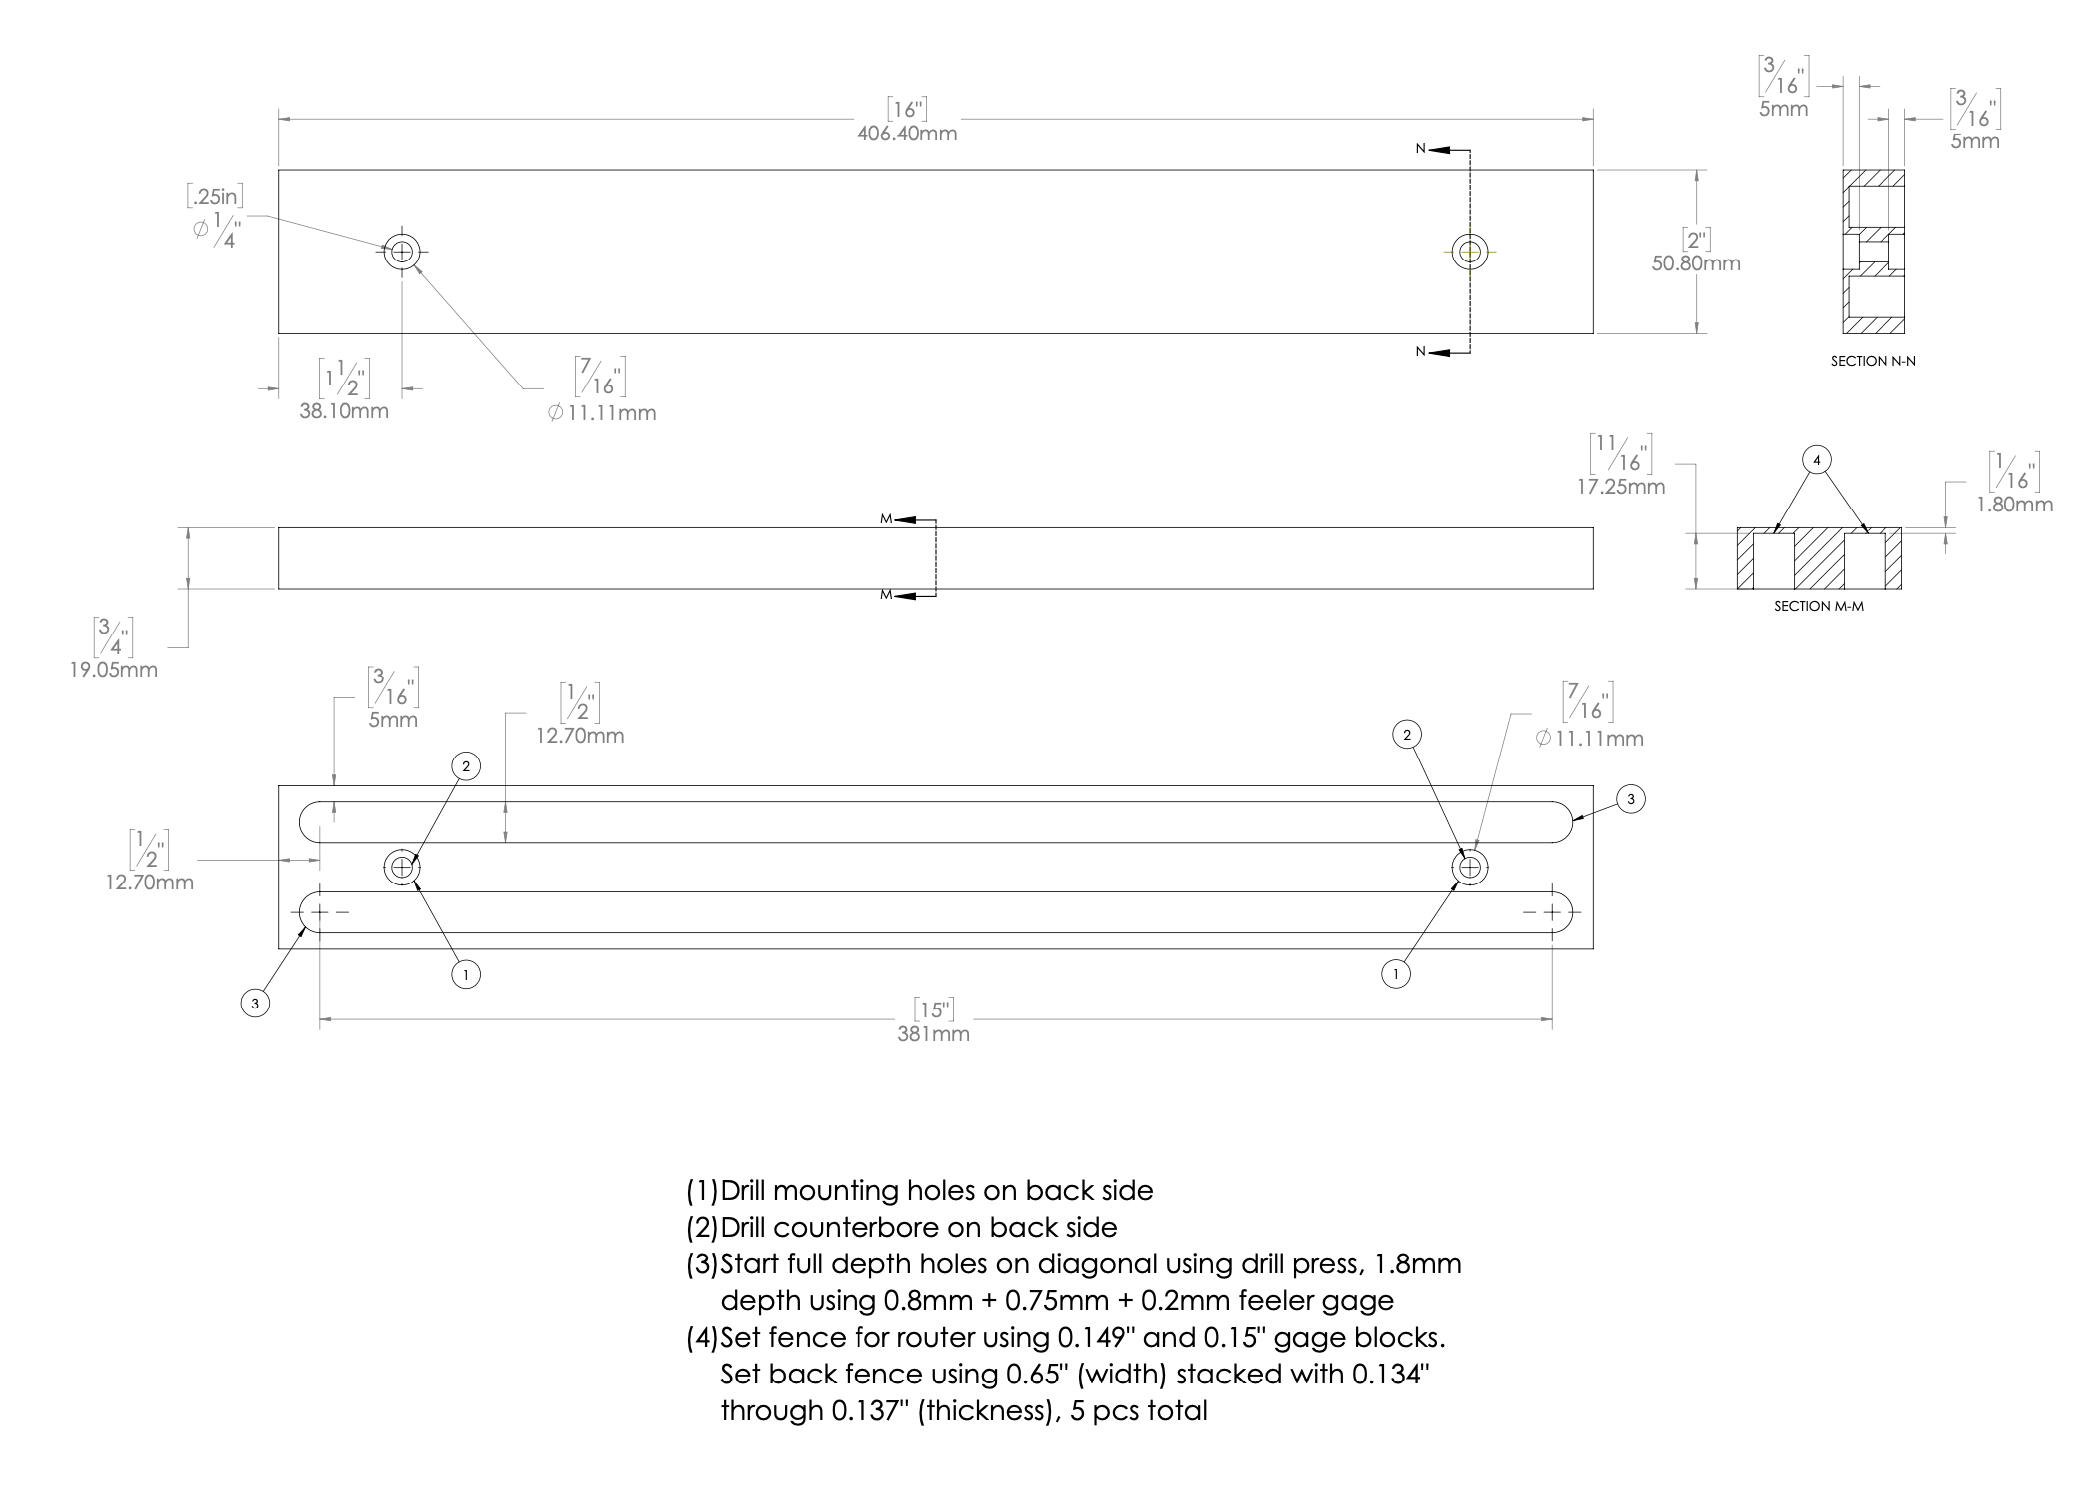
Length: 16", this was the minimum length needed to fit all my current kitchen knives (6-7 knives of various types).
Width: 2", this is a standard size for finished lumber and is not too wide that paring knives would hang off asymmetrically.
Thickness: 3/4", this is also a standard size for finished lumber and gives enough room for knife handles to hand down without touching the wall.
Mounting: I like the look of a "floating" block with all the mounting hardware hidden (think picture frame style mounting), but decided to prioritize reliability by thru-mounting directly from the front into drywall or studs. How many mount points? Two is classic but as the span between increases, the more any forces in the middle will bend and deform the block. I set the mount points 1.5" inwards from the sides, making the mid-span only 13". Would setting the two screws so that they divide the block into 3 equal sections be better? Maybe, but it would look pretty unusual (actually, placing the mount points 3.4" from the ends of the block would theoretically be optimal for a uniform load- see Airy points).
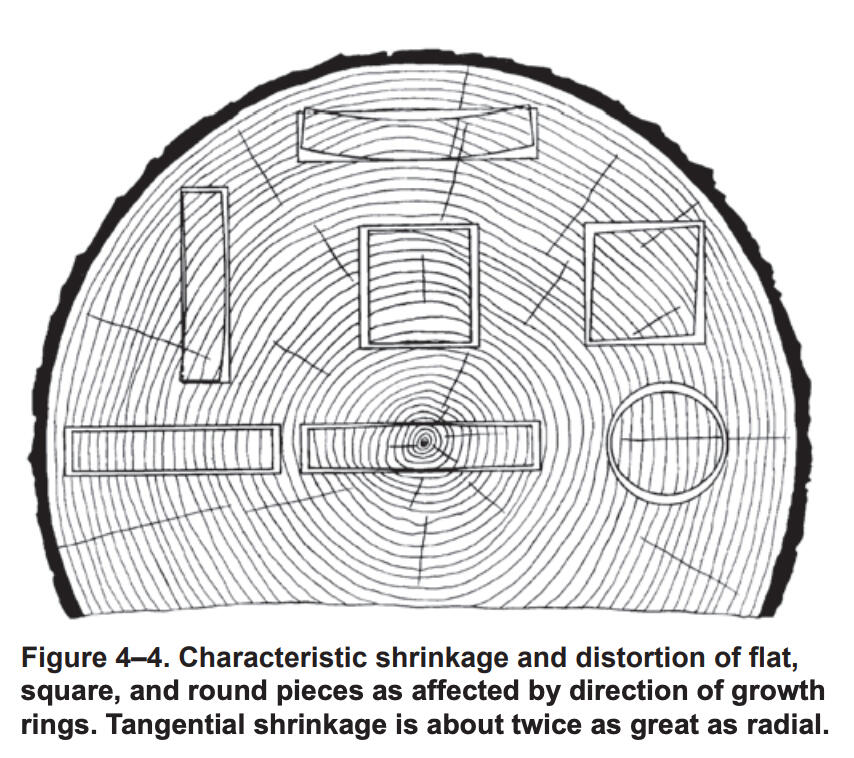
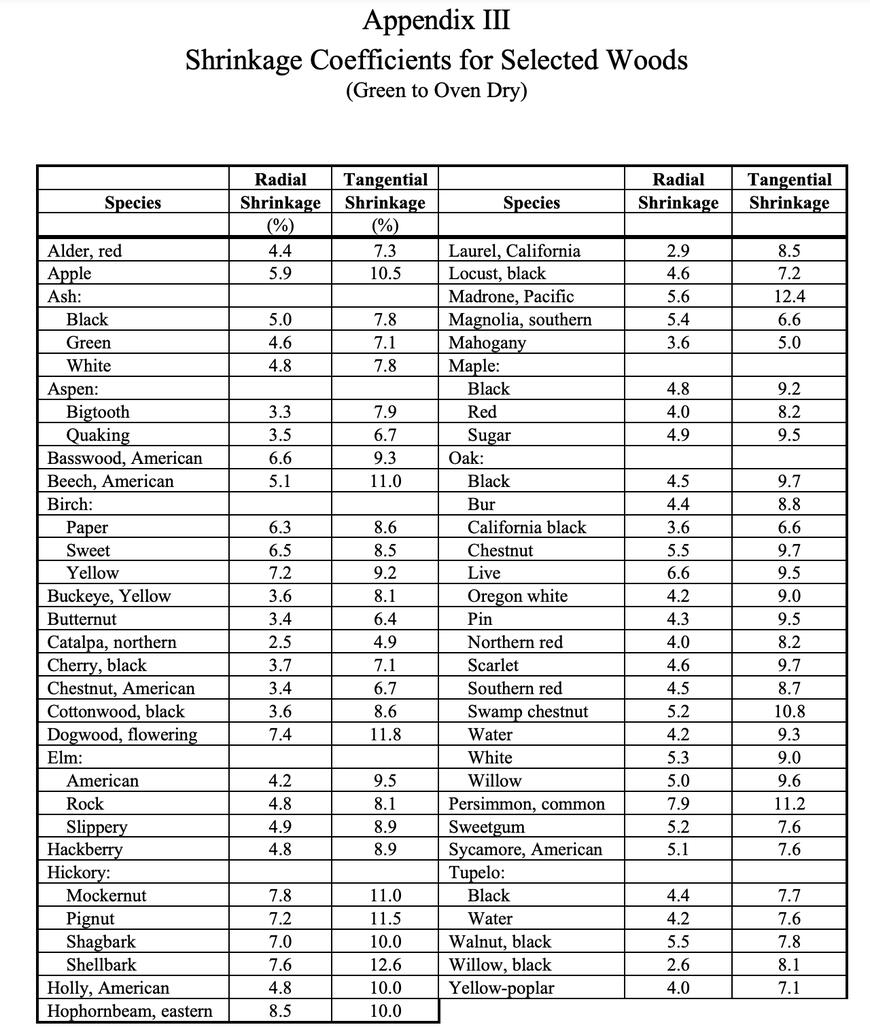
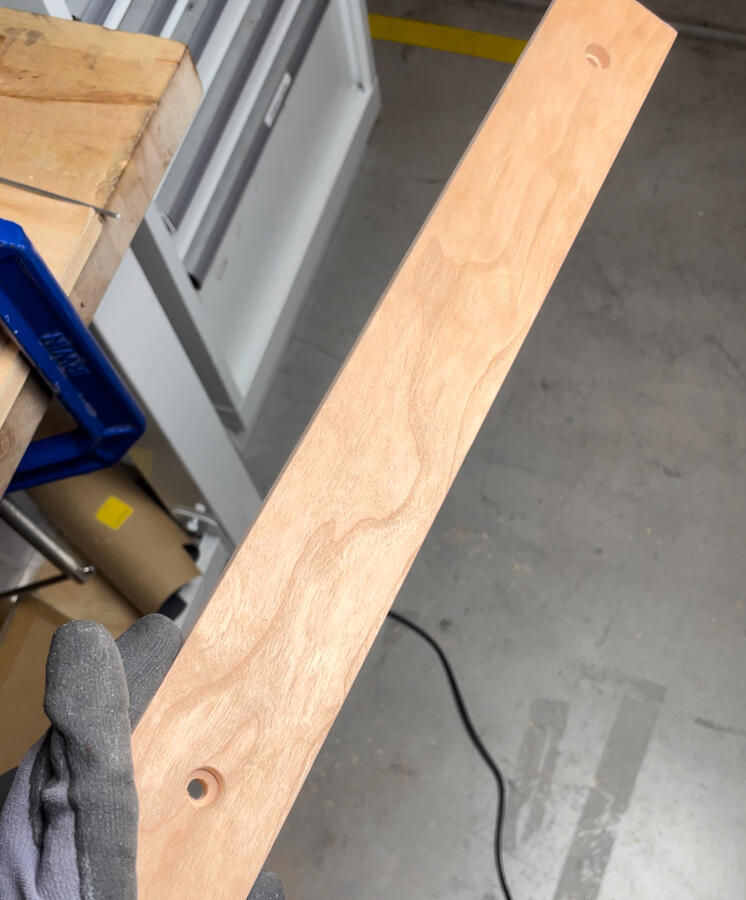
In choosing the type of wood, I knew the dimensional change due to changes in seasonal moisture would be very important.Most boards are plain sawn, which leads to tangential fibers across the width of the board. This is the direction with higher shrinkage percentage, so the boards tend to warp (see the top middle example in Fig. 4-4, "cupping"). A Quarter sawn board, see the middle left in Fig. 4-4, would have been much more stable, but it's also a lot harder to source and more expensive.Since I was pretty much limited to plain sawn boards, I chose a wood species with reasonably low tangential shrinkage values, and at a reasonable price. Black cherry at 7.1% shrinkage is a reasonable choice, and I avoided species like Beech at 11%. Using a shrink rate calculator, 1.4mm change in width seasonally can be expected for my 2" wide plain sawn boards. Since I don't have a planer I chose to buy pre-surfaced wood stock, called S4S (surfaced 4 sides).Taking care to prevent excess warping is super important here because any "cupping" of the wood will change the gap between the embedded magnets and the knife. The magnetic pull force decreases exponentially with distance, so even small changes can have a large effect. More on that in a later section.
How to pick the right size and strength magnets?
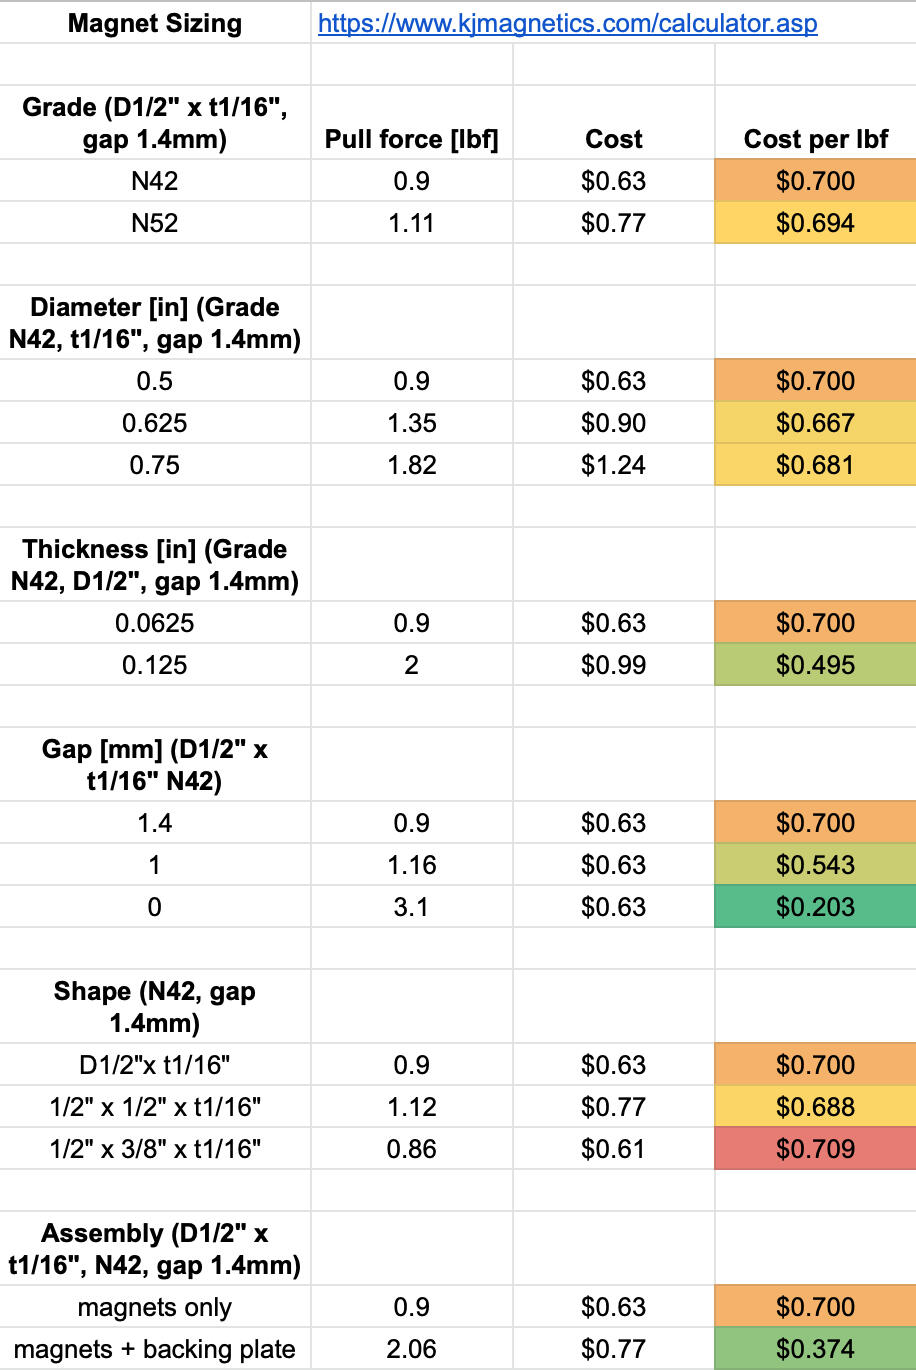
Magnet to knife distance: The gap distance is the single most cost effective way to alter the pull force, since it's free! However, we don't want metal on metal contact to prevent scratching and rusting. The thickness of wood should be at least 1.4mm (~1/16") for durability and strength reasons.
Magnet shape: Square is more cost effective per pound of pull force, but for the same linear size it weighs more. A rectangular one with close to the same volume is less cost effective. Need to investigate more! Increasing magnet diameter did not affect the $/lbf; increasing thickness was much more effective at lowering cost.
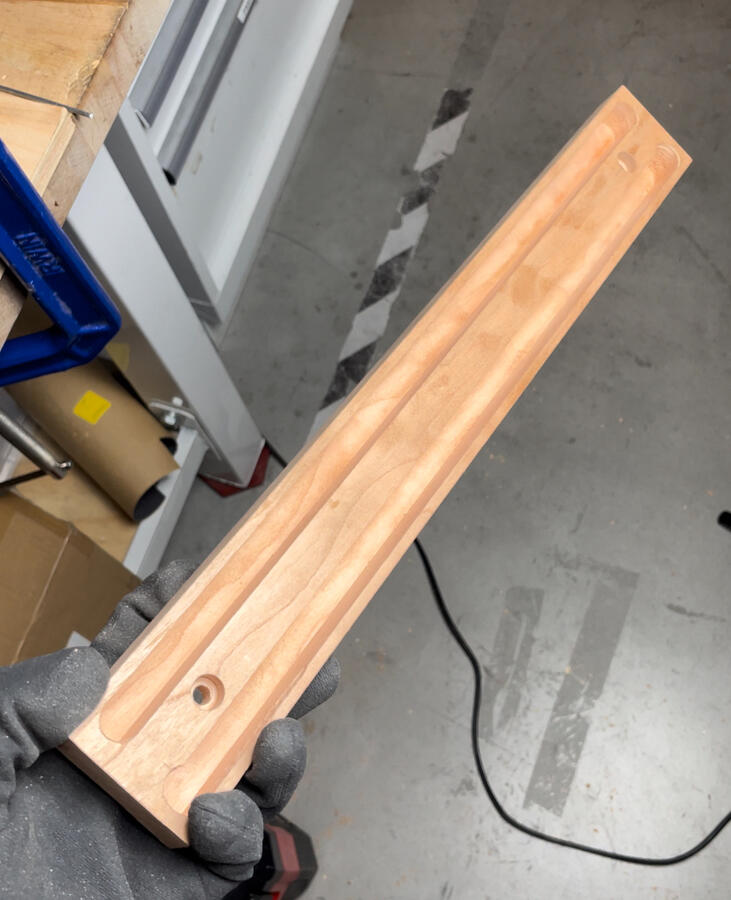
There's also a hidden cost to increasing the diameter of the magnets. The size of the router bit used to carve the wood must also increase (or multiple passes must be taken), drastically increasing cycle times for that operation. I found a single pass with a 1/2" bit was best. So all magnets have to fit within a 1/2" wide slot, but are not as restricted on thickness.
Magnet grade: Cost per pound from N42 to the stronger N52 is roughly equal.
Magnet orientation: Tests have shown that a North-South alternating polarity is strongest.
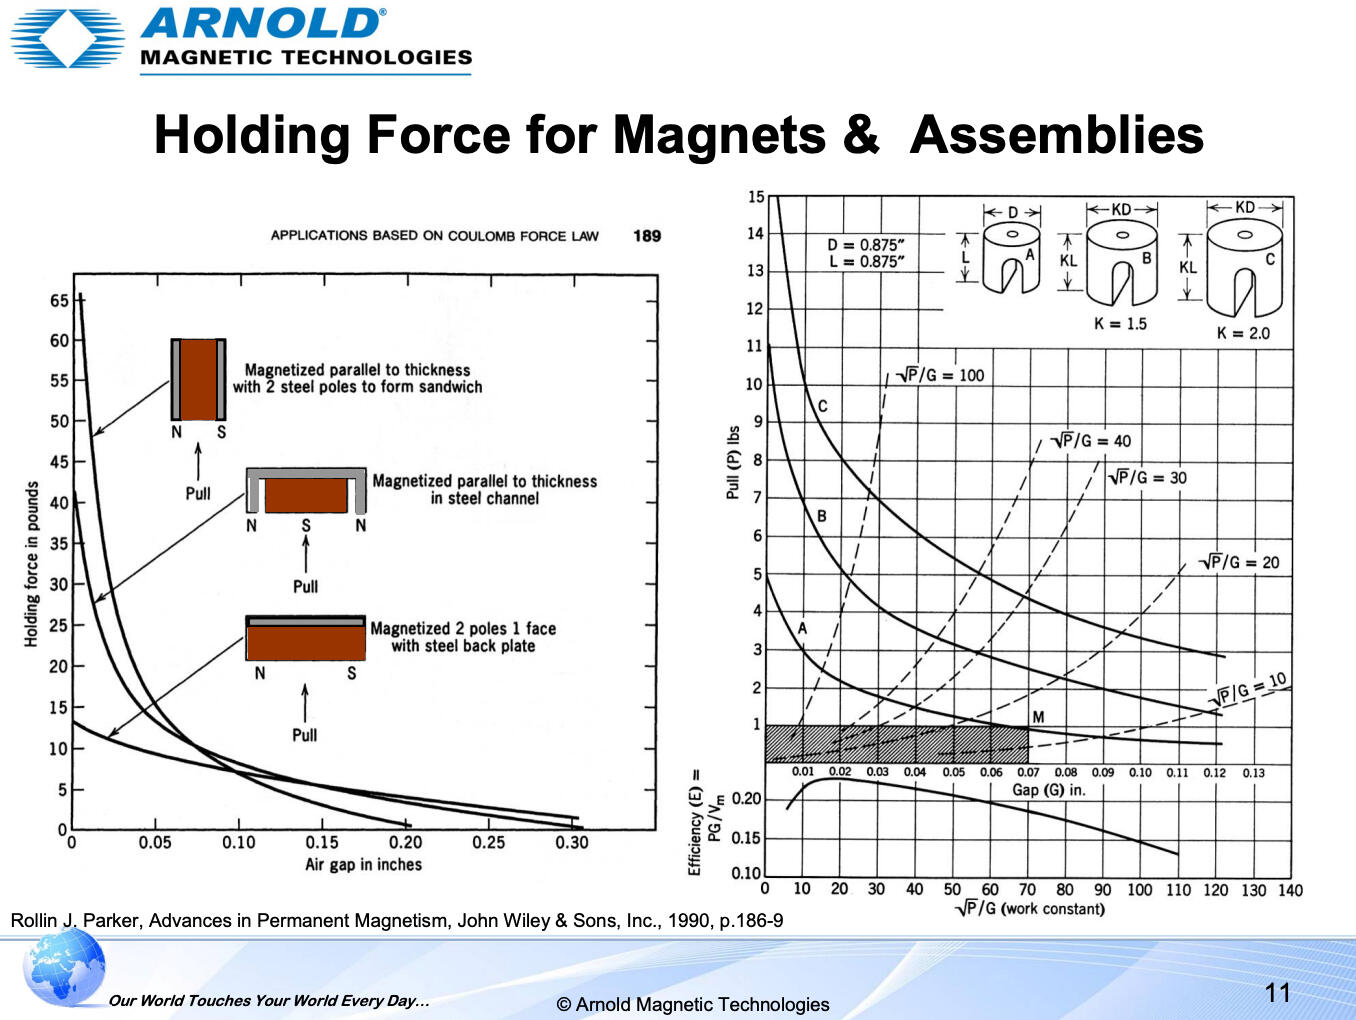
Magnet assembly: Changing the magnetic field shape to concentrate towards the knives can be very effective. You can add a steel bar behind the knife. You can also put the magnets in a C-channel, which is even stronger (but hard to manufacture without tooling). Steel, being a better "conductor" of the magnetic flux, concentrates the magnetic field. However, this also means the field is relatively weaker at farther distances.
Friction: The magnets pull the knife to the block surface, and the friction generated is what actually holds the knife to the block. This can be improved if a tacky coating is applied, for example. For this project, I stuck with a food-safe wax and oil based coating typically used on cutting boards.
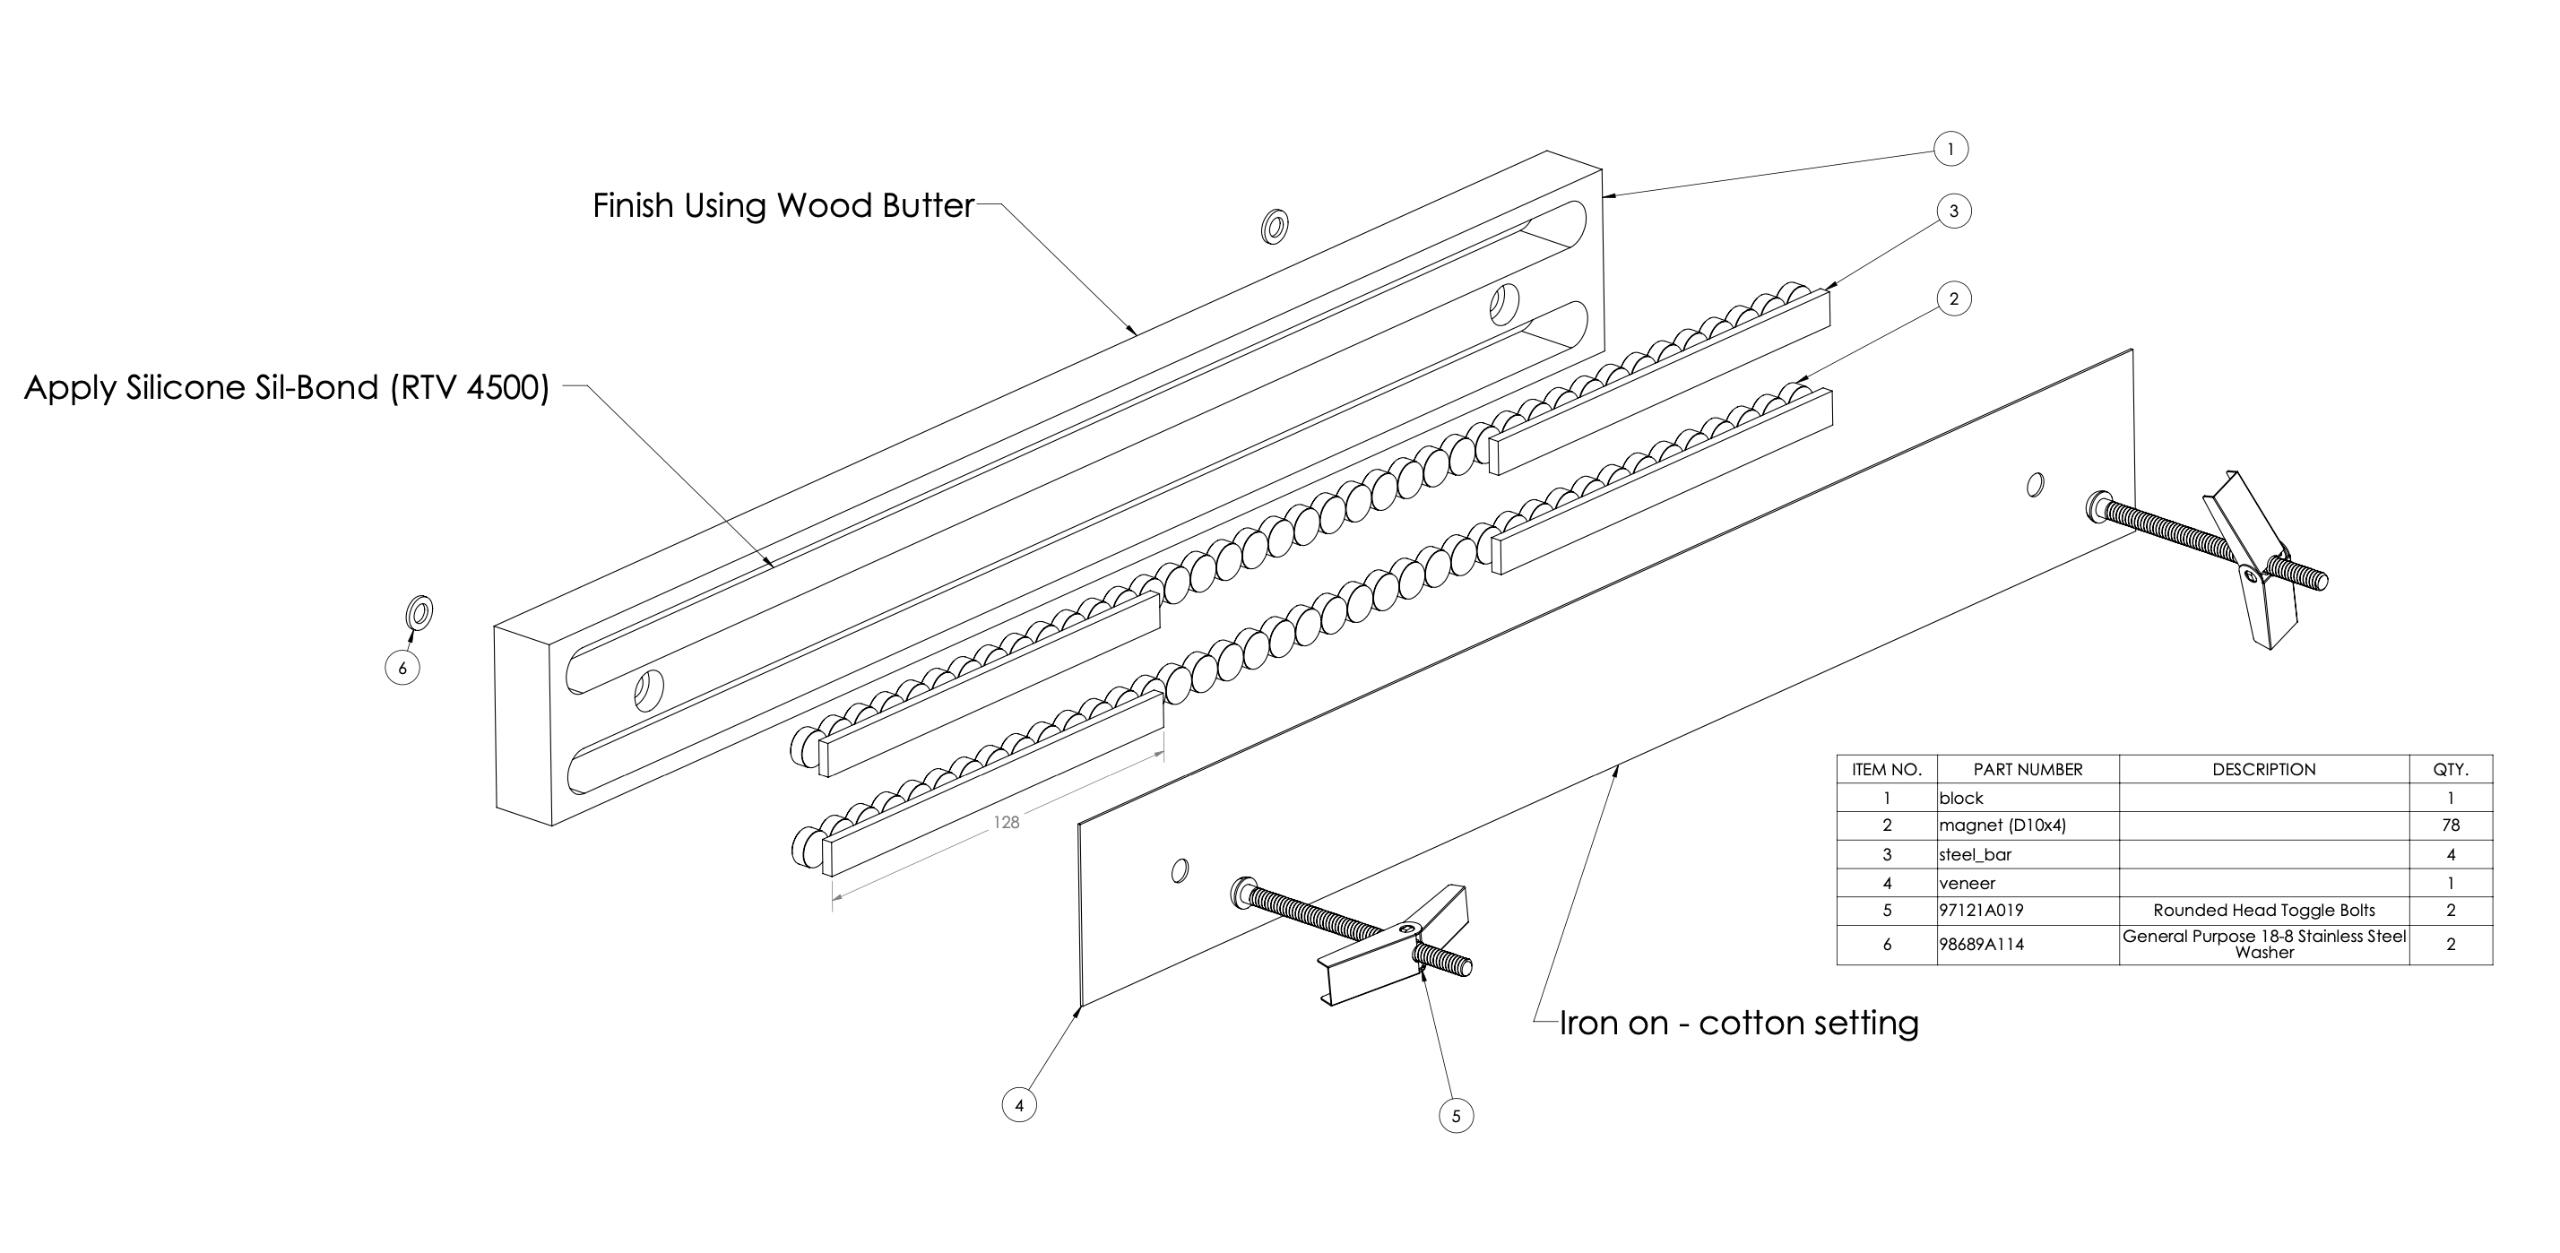
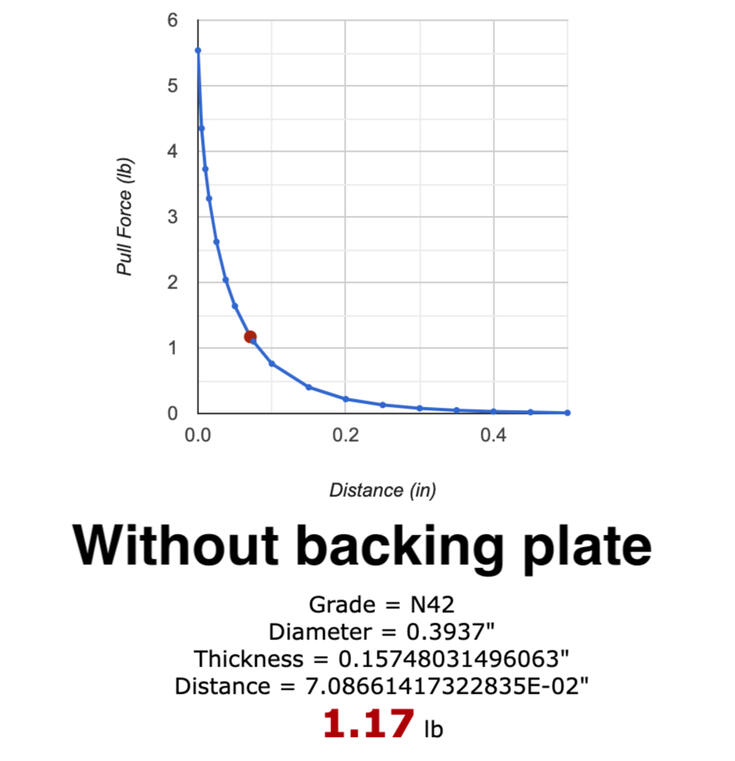
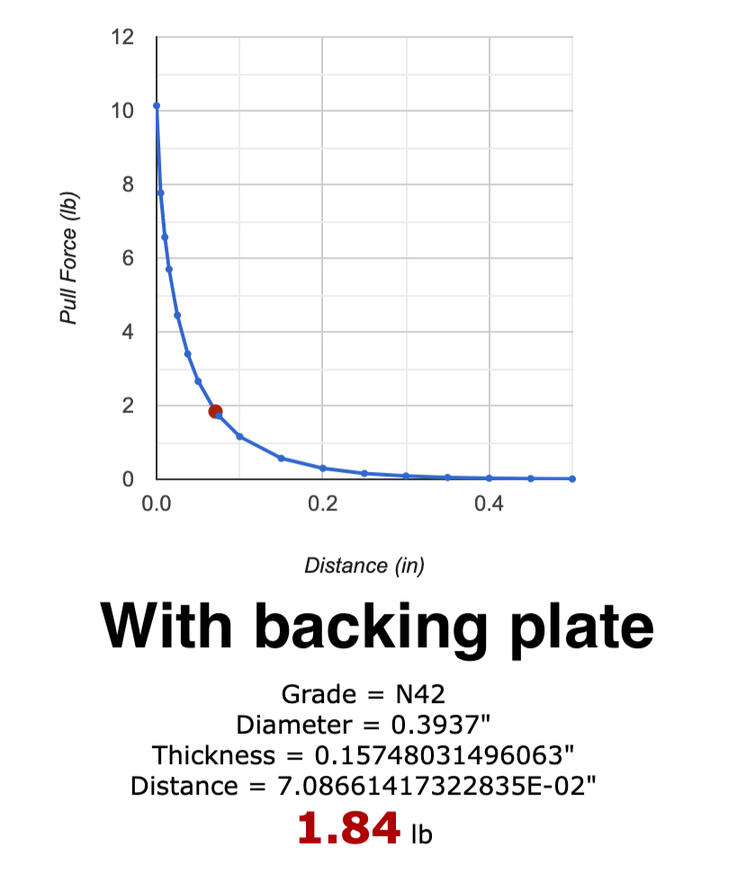
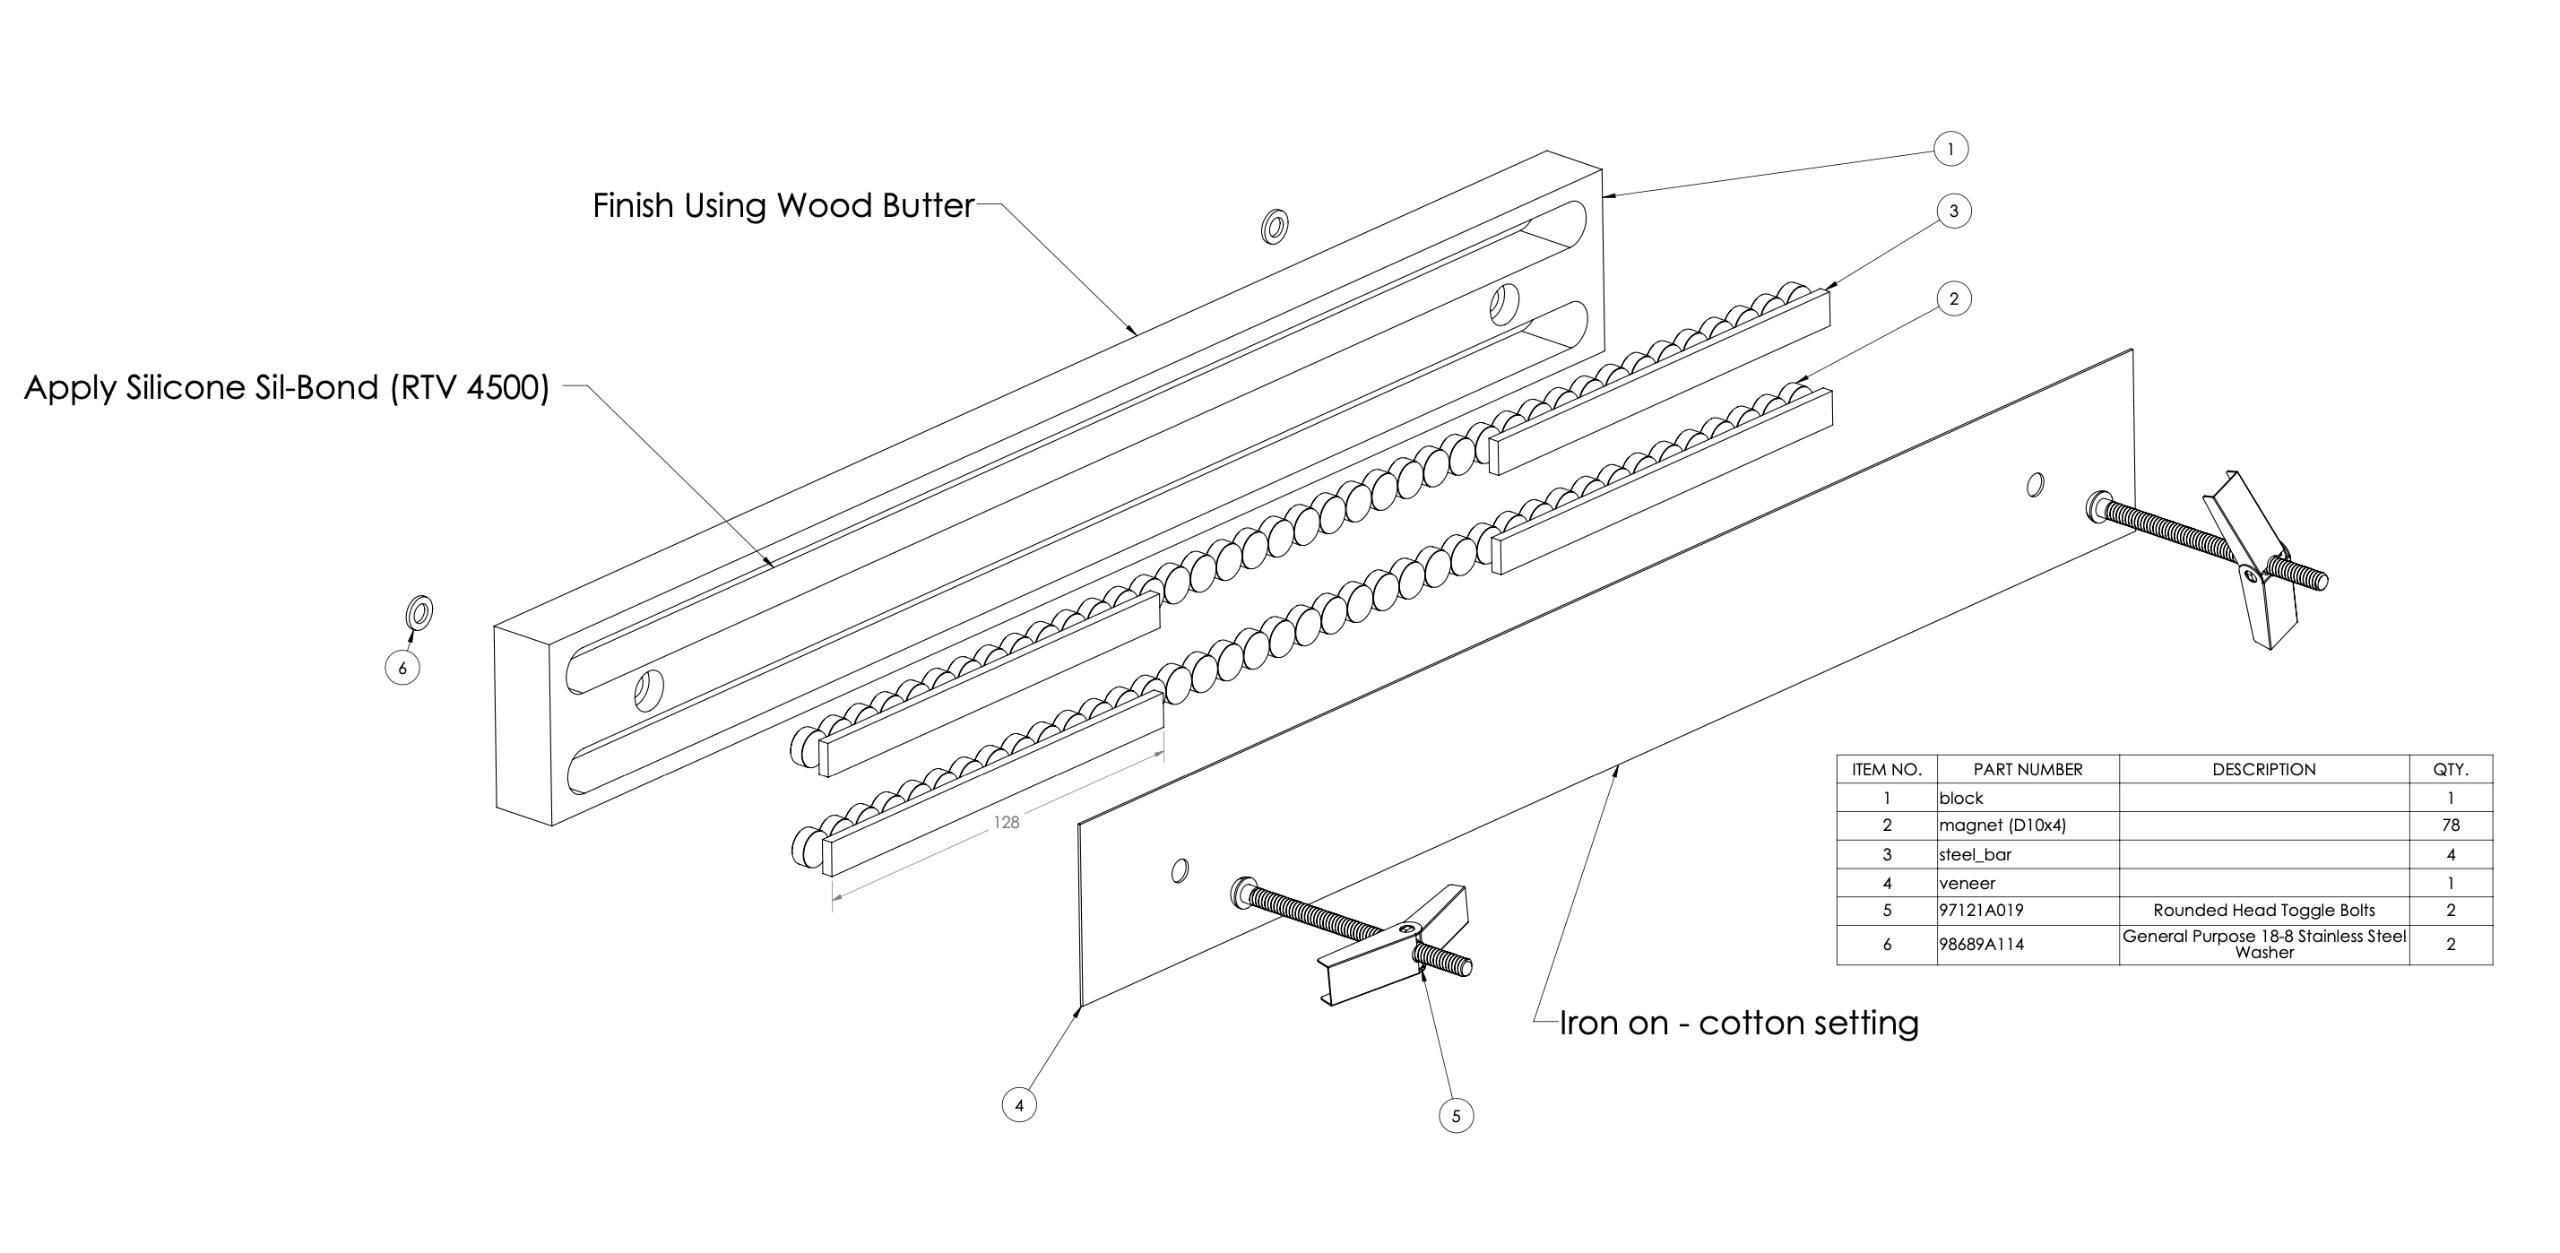
Knife geometry: The wider the knife gets, the more magnets beneath it, and the higher the pull force. A paring knife will need a stronger magnetic field vs a cleaver, since the cleaver covers so much more area.In fact, my testing showed that a comfortably strong hold on a paring knife resulted in an excessively strong hold on the cleaver. We see that adding a backing plate can enhance the pull force significantly.I designed my block to have backing plates at each end (so that the areas with stronger pull forces are closer to the mount points; less bending of the block), and a middle section with no backing plate. You can place bigger knives in the middle, and smaller knives to the sides, and the result is more uniform holding force.Knife material: Steels which have high relative magnetic permeability will have a stronger interaction with the magnets. For example, air is 1, aluminum is 1, carbon steel is 100, and ferritic stainless steel is 1000-1800. In practice, for this kitchen application, most knives seem to be ferritic and hold pretty well.
I mentioned the exponential loss in pulling power with distance earlier. This presents a problem, since wood will warp over time. You need to select the magnets such that, with a reasonable nominal gap, the pull strength is in a region of exponential decay curve where changes in gap have less effect. For example, if the magnets were sized to hold a knife with direct contact, adding just a 0.25mm gap would decrease the pull force by 33%. In my design, since the magnets are designed to hold properly with a nominal 1.8mm gap, that same 0.25mm gap increase would only cause a 14% decrease in strength.
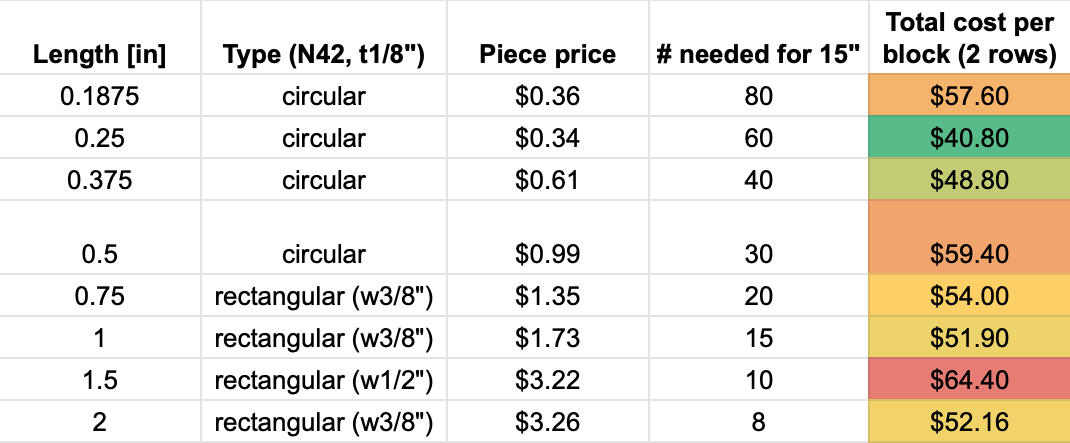
The total cost is determined by how many magnets are needed to cover two rows, 15" long. Again, the max width allowed is 1/2" due to the amount of wood I was removing, and at some point you reach an optimum thickness. Excessive pull strength is not desirable, and you would have to decrease the strength by increasing the gap. That's wasted magnet strength (and cost). Besides, a cheaper way to increase the strength, as we saw in the cost per pull chart, is to add a steel backing plate.What about spacing the magnets out so that there's a small gap in between? I didn't want to add the assembly complexity of spacers or the upfront tooling cost of assembly guides. Very widely spaced magnets have an unpleasant "snap to grid" effect, so I avoided that too.The choice of magnet length is interesting. To make a 15" long magnet assembly, you could use lots of short magnets, or fewer long magnets. Taking a look at the price vs length table, we see that a moderate size (1/4" to 3/8") is more cost effective than the larger sizes.But the price per 16" block (15" magnetic assembly length) for all those different magnet options is absurd! The cheapest option is over $40 in magnets alone. The prices here are based on USA reseller prices (KJ Magnetics); but almost all neodymium magnets are produced in China. Clearly, I had to try and buy direct from the source.
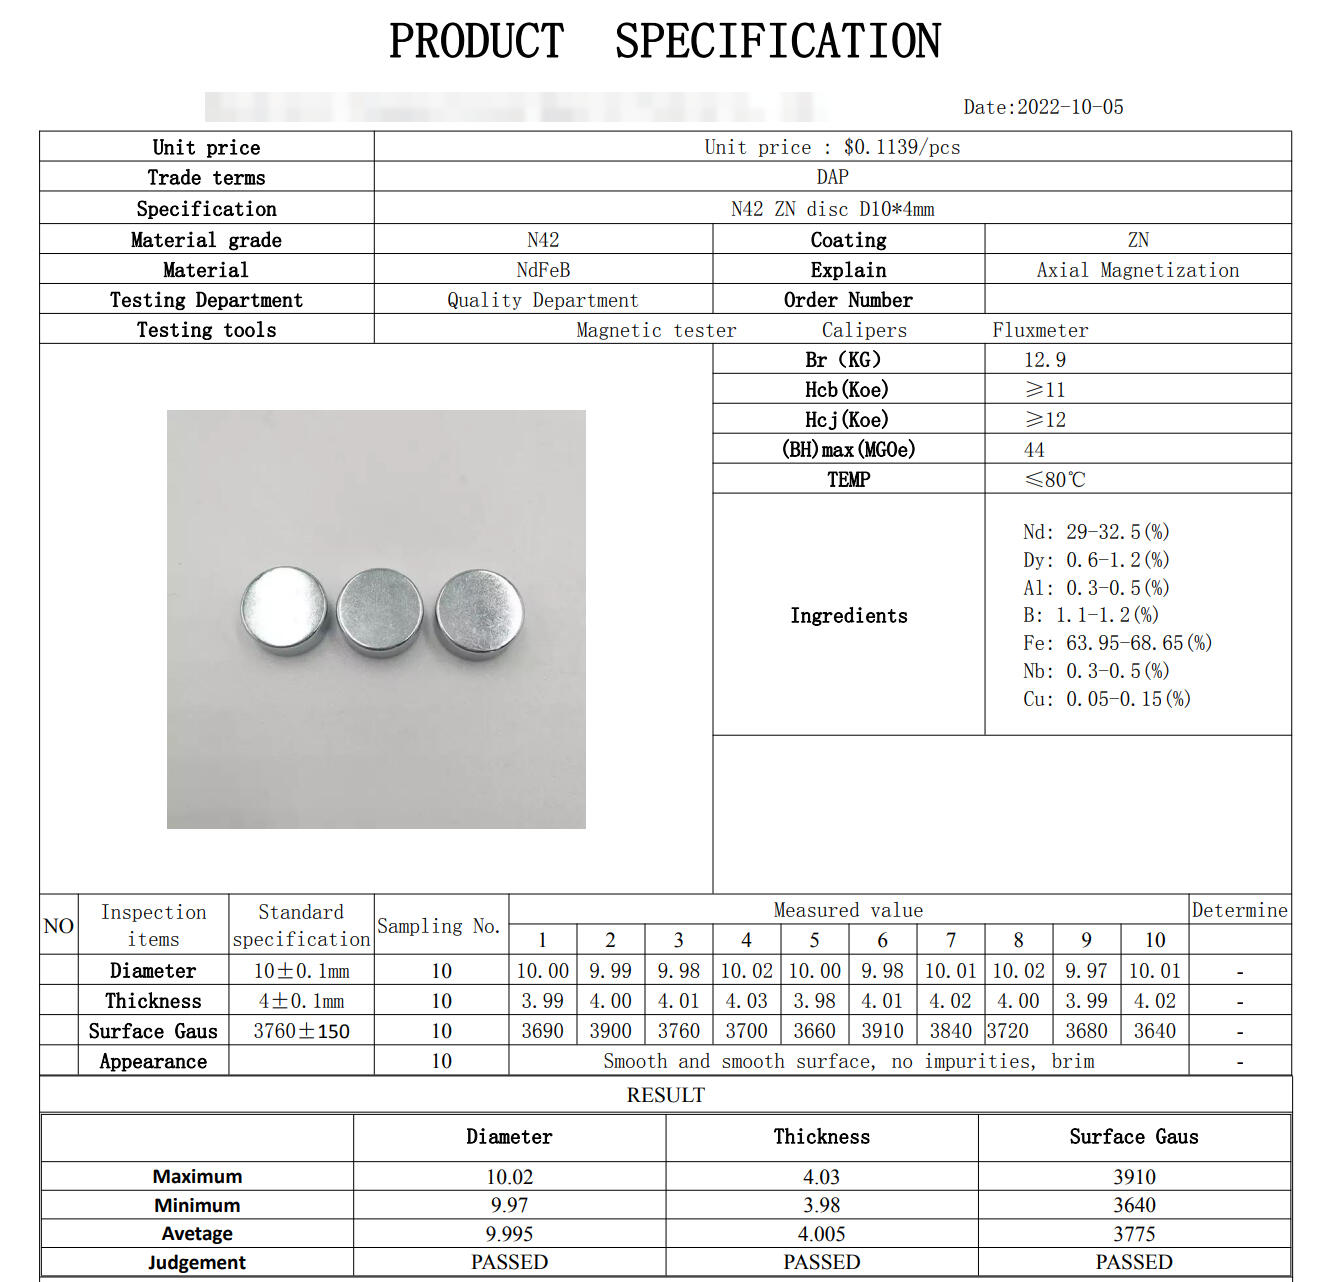
I first went to Aliexpress to try and find off the shelf magnets close to N42, diameter 3/8" and 1/8" thick. So many options that were close, but not right. So I created a company account on Alibaba and dove right into the sourcing world of incoterms, supplier agreements, samples and specifications. You also have to watch out for companies that are fraudulent, or are just middleman resellers for the actual factories. After messaging 7 or 8 companies, I eventually found what seemed to be a legitimate manufacturing supplier from Dongguang, China, the "factory of the world"! The price was right, at less than $0.12 per magnet, a huge difference from US based resellers.
After submitting a contract for the specification, price, and shipping, I paid and waited for delivery, eagerly hoping I would get a high quality product (sight unseen). It would take about 3 weeks for the air shipment from China to San Francisco, with a full week stuck in Osaka, Japan, awaiting customs clearance (neodymium magnets from China are subject to tariffs, but shipments under $800 are excluded!).
While I waited, I got started on the actual construction of the knife block.
Initially I struggled a bit to get the fixturing for the router set up.I eventually figured out that holding the board down via the two existing thru holes was a good way to leave the surface of the boards open so the router could pass freely over the entire length.Each board takes about 30 min to manufacture manually, which is far too long.Switching to CNC routing makes this manufacturing step feasible for larger quantities. About 35s vs 30 minutes per block!
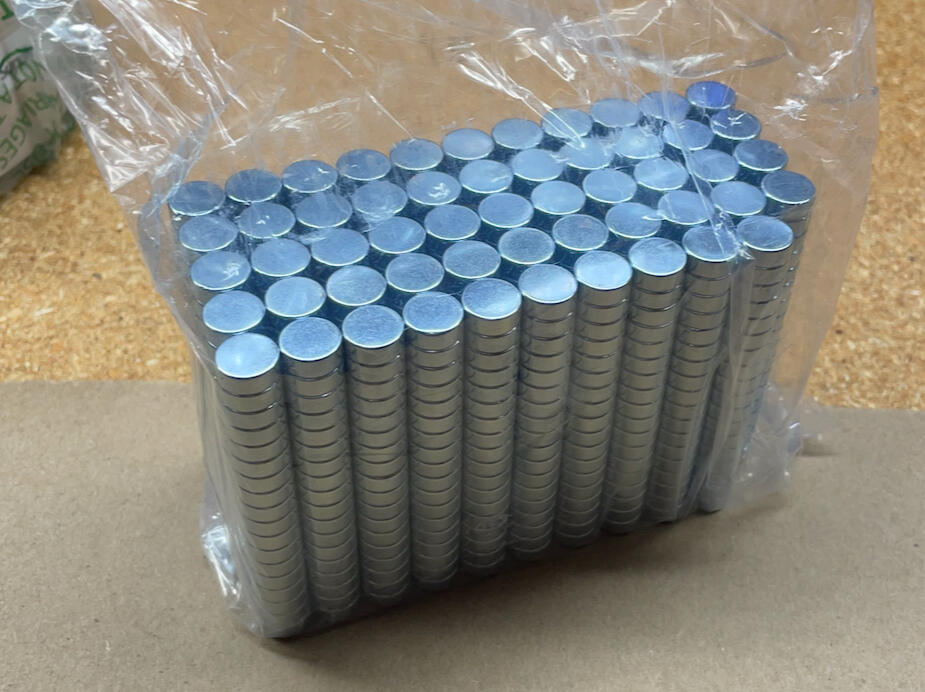
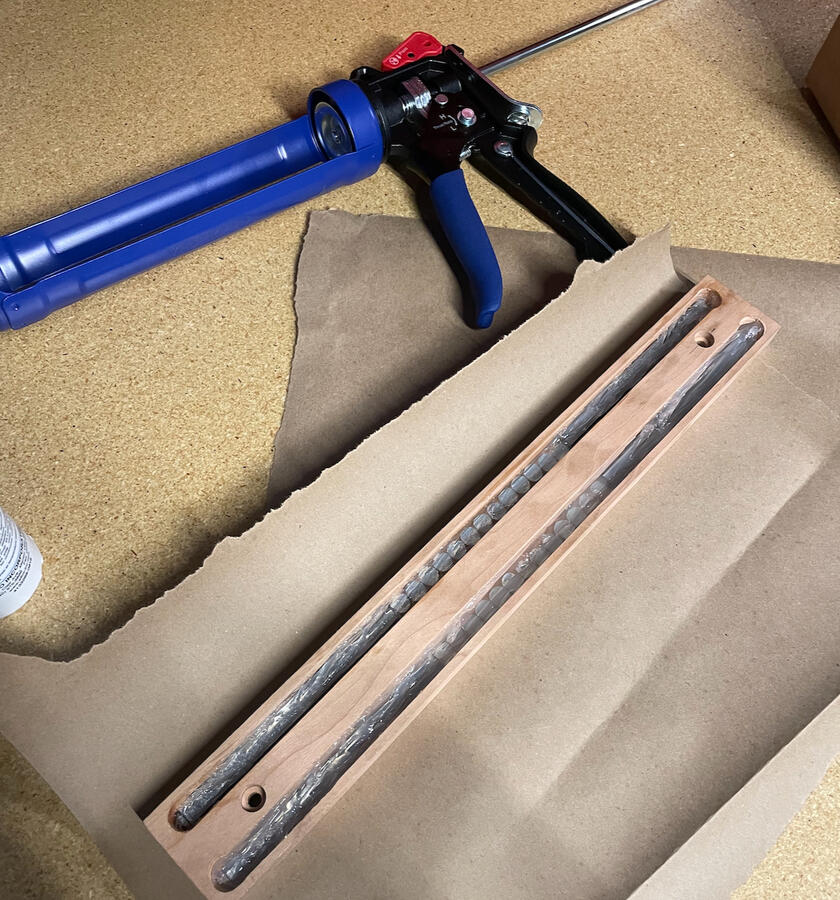
The magnets came in a block of 1000 pcs, and with these strong grade magnets, it can be challenging to separate them! I found that even with careful handling, the magnets could leap across a foot of empty air and snap together with enough force to chip and crack.I installed the magnets inside the block, making sure the polarity alternated N-S-N-S for higher magnetic strength.In the sections with steel backing strips, I installed the magnets on the strip first before dropping the whole assembly into the wood slot. When I first tried it the other way around, the magnets joined with the steel with so much force that a few of them cracked!After everything was in place, I applied a food safe silicone sealant liberally to keep everything in place.
The cherry blocks are finished with a food-safe mineral oil and wax "butter", typically used for cutting boards.The natural wood grain comes through with a subtle sheen, but over time it definitely becomes more matte.On the backside (not shown), I applied a cherry veneer to make the block appear to be solid wood from all sides.
Here's a video showing the final placement of the magnets within the block, and mounted to the wall.You only need light torque on the bolts holding the block, "hand tight" is enough! I recommend using toggle bolts if installing into drywall.
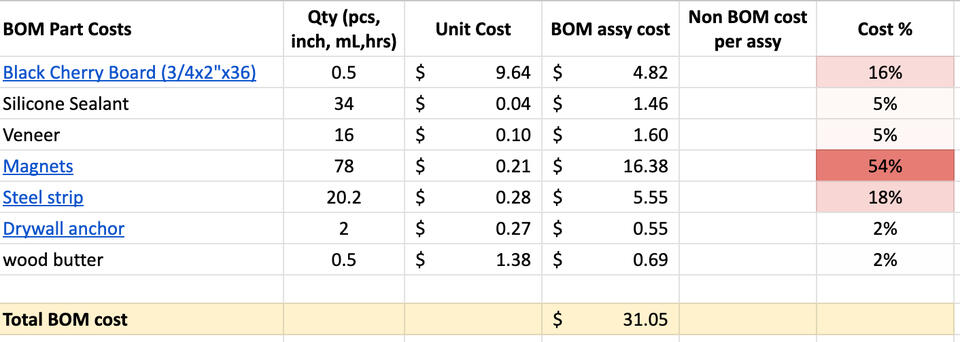
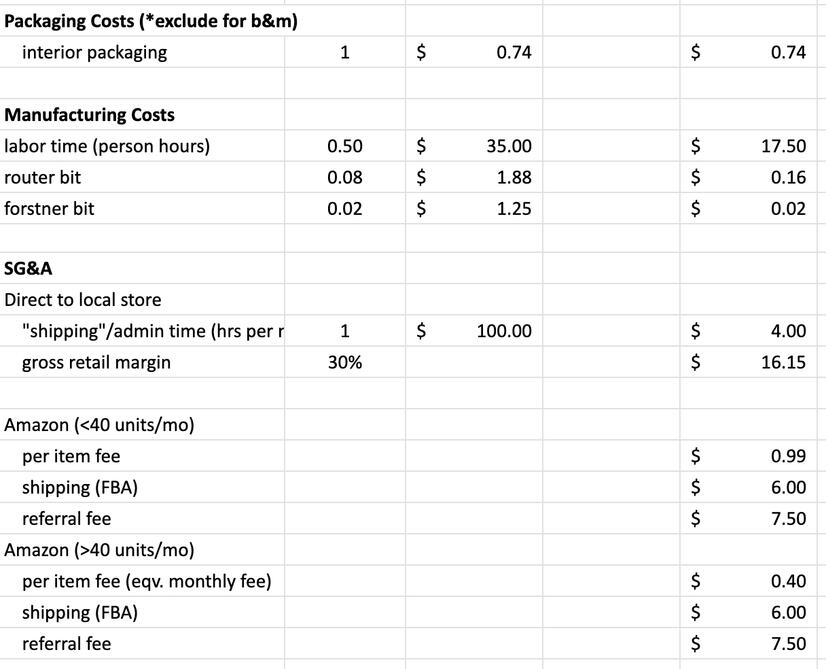
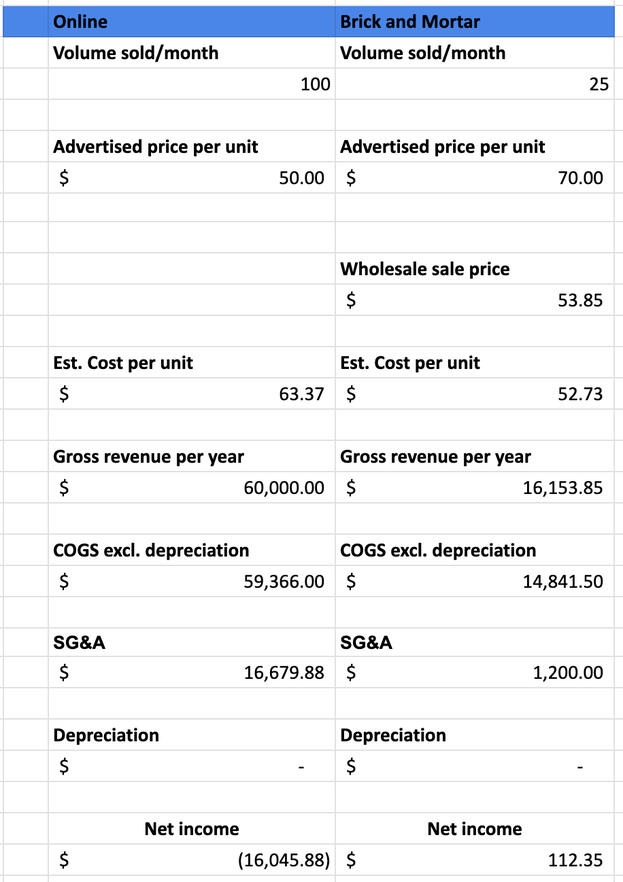
This product as-is could be profitable in physical botique stores, because I could probably charge more. I would have to sell about 25 a month in order to pay myself back for the time in running the business, so margins are very small. Labor costs are a big variable, as is the gross retail margin the boutique store would take.The economics don't work out for online selling as-is, mostly because of the percentage that goes to the online platform. Making the steel strip and cherry board cheaper is one way to get to profitability, although margins are still very slim online. It would still be more profitable selling locally in boutiques (and at lower volumes). I estimated volumes of 100/month online vs 40/month retail.Moving production to a low cost country would dramatically lower costs of the individual parts, especially the magnets, due to lower logistics fees. However, I still need to include an analysis of logistics costs for the finished goods to make a fair comparison.However, at these projected COGS, the value of online sales starts to become more attractive.Further analysis is needed on sales volumes over time, as well as getting quotes for the lower cost countries parts BOM and labor rates.I think I could reduce labor costs by investing in tooling: an injection molded plastic part could hold the magnets, and would greatly reduce the time consuming magnet installation step.Feedback from early testers indicated that mounting using drywall or wood screws is a pain point. Perhaps improving the ease of installation, or enabling robust, reliable temporary mounting, is a differentiator to look into as well.
